

Showing posts with label Party Decor. Show all posts
Showing posts with label Party Decor. Show all posts
Tuesday, August 14, 2012
Cars Party Decor
Cars Party Decor
Designed for Oh My Crafts

Supplies: Cricut Cartridge: Cars | Oh My Crafts Vinyl : Assorted Colors | Sizzix : Bigz Pro Die - Box, Popcorn #2 | Napco : Set of 2 Planter (Yellow and White)
Instructions: Start by cutting out backgrounds for each image in black and then cut out the features with the appropriate colors. Use transfer tape to assist in putting the large pieces of vinyl on the background but for the small pieces, you should be fine without it. The black background should have cuts that help when layering the vinyl.
All of the vinyl was cut at blade setting 5, Medium depth, and fast speed.
Image from Cars Cartridge
|
Vinyl Colors
|
Size
|
"The World of Cars" Sign
|
Ebony, Cherry Red and Cloud White
|
11 1/2"
|
Mater
|
Ebony, Cloud White, Walnut, Peanut Butter, Elephant Grey, Stormy Grey, Celadon, Metallic Copper
|
11 1/2"
|
Lightning McQueen
|
Ebony, Cherry Red, Cloud White, Lemon drop, Persimmon, Walnut, Admiral Blue
|
8"
|
Many of the cars will not cut larger than 11 1/2"; however, this Lightning McQueen will cut very large (note that this car cut at 8”).
What's a party without popcorn? Here's how I made the boxes:

Simply die cut the boxes with the Big Shot Pro machine and assemble. Use Oh My Crafts Exclusive Acid Free Craft Tape ½”x5 feet for a strong hold. Adhere a Cars emblem to the box in vinyl. Line the boxes with a plastic bag (found at general party stores) and fill with popcorn or goodies.
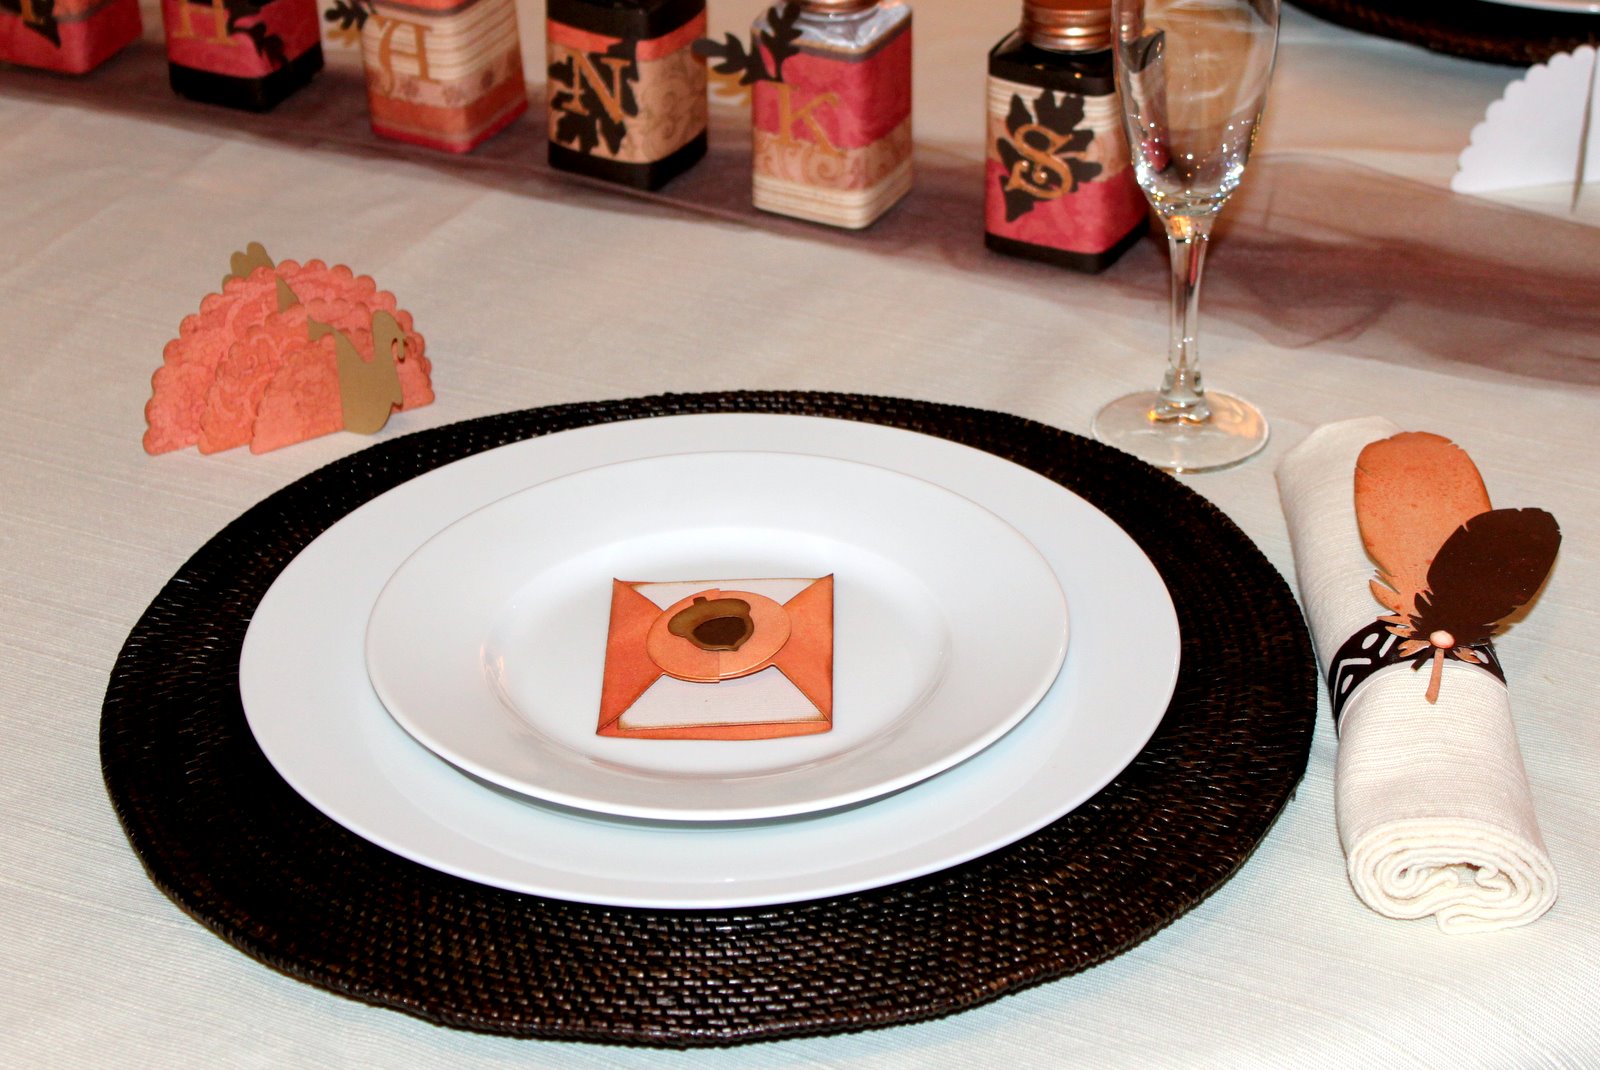
Thanksgiving Table Decor
Featuring Lifestyle Crafts “Be
Stuffed” Dies
Designed for Oh My Crafts

Paper
Turkey
.JPG)
Supplies:
Lifestyle Crafts : TURKEY | Bazzill Basics
: 12" x 12" Smoothies Cardstock: KRAFT |
K
& Company: TIM COFFEY HALLOWEEN & FALL 12X12 DESIGN PAPER PAD
Instructions:
- Die cut Turkey wings with the Epic 6, Big Shot/BigKICK, Vagabond, or Cuttlebug machine and paper from the Fall paper pack.
- Die cut Turkey body with Kraft paper.
- Place wings into the slits of the body.
- Optional: Ink the edges of the turkey with a brown ink pad, if desired.
Place Cards
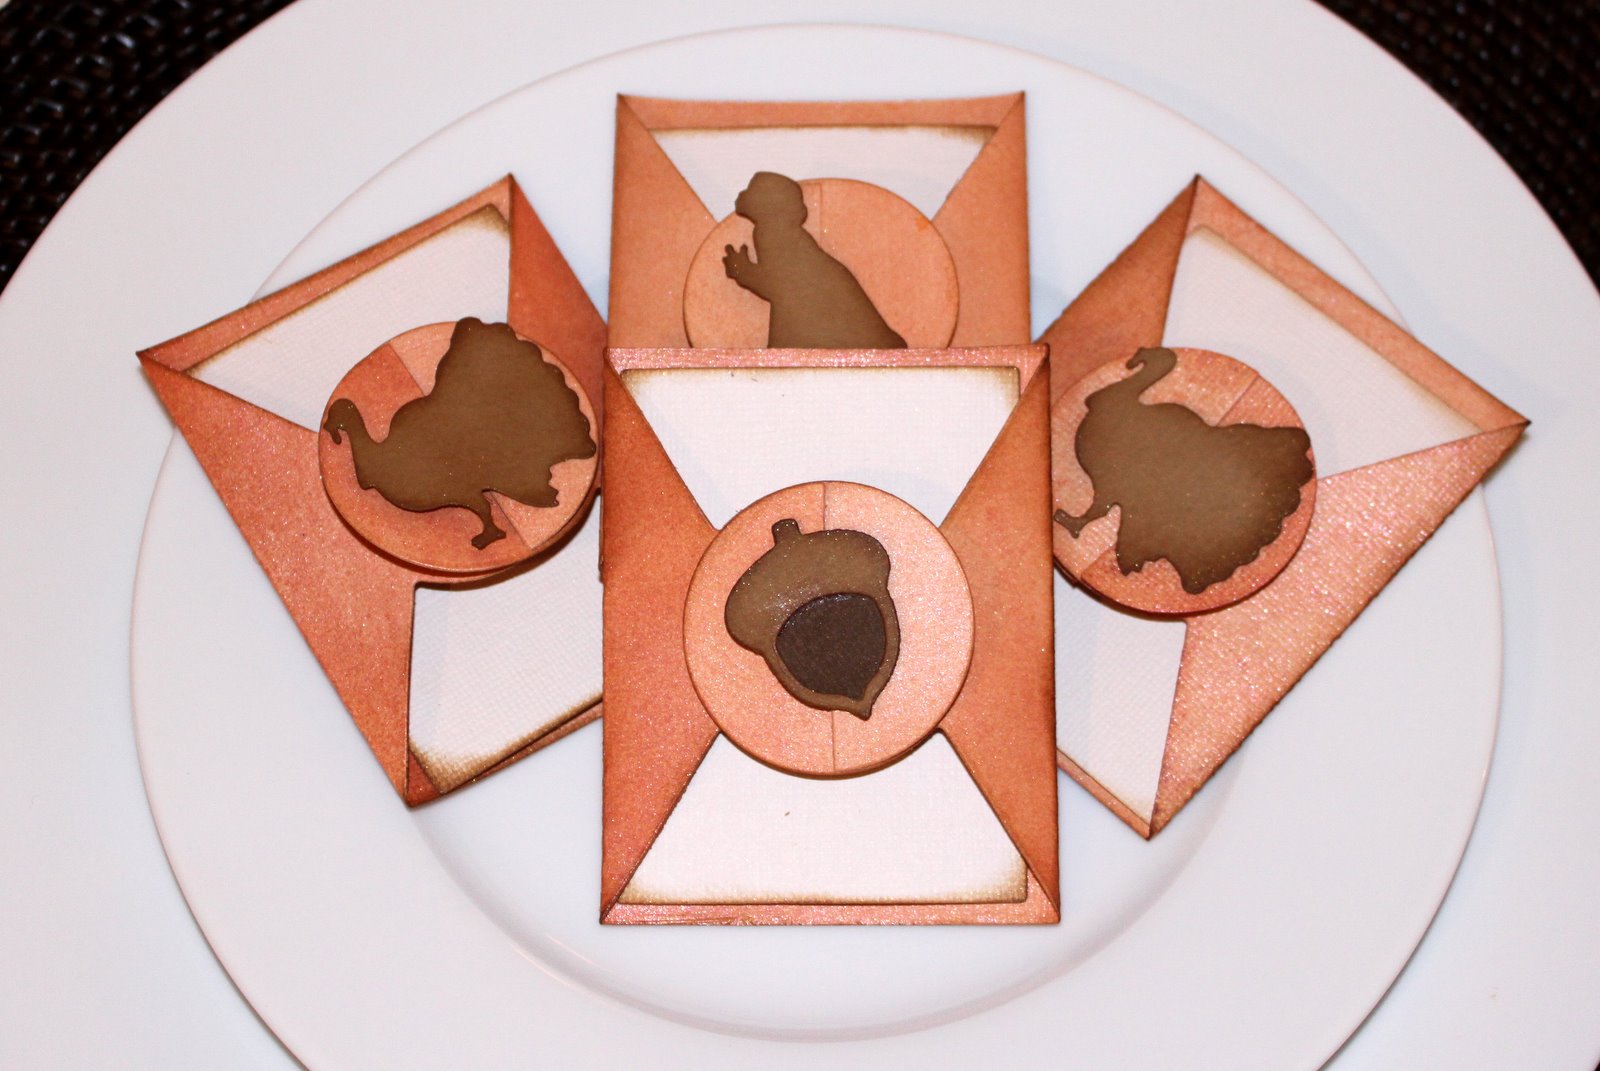
Supplies:
Lifestyle
Crafts : PLACE SETTING KIT | Lifestyle
Crafts : ACORN | Lifestyle
Crafts : TURKEY SILHOUETTE | Bazzill
Basics : 12" x 12" Monochromatic Cardstock: BROWN | Bazzill
Basics : 12" x 12" Monochromatic Cardstock: VANILLA | Bazzill
Basics : 12" x 12" Smoothies Cardstock: KRAFT | Tattered
Angels: LIMITED EDITION GLIMMER MIST - 2 oz. spray bottle
(Butternut Squash and Rum Punch)
Instructions:
- Die cut vanilla paper with the Place Setting Kit (both the envelope and card).
- Spray both sides of the envelope with Tattered Angels Glimmer Mist and let dry.
- Die cut Thanksgiving images such as the Turkey and Acorn out of Brown and Kraft paper.
- Optional: Ink the edges of the card and Thanksgiving images with brown ink.
- Fold the envelopes, insert card, and adhere the Thanksgiving images to the front of the envelope.
Napkin
Rings

Supplies:
Lifestyle
Crafts : FEATHER HEADBAND | Bazzill
Basics : 12" x 12" Monochromatic Cardstock: BROWN | Bazzill
Basics : 12" x 12" Monochromatic Cardstock: VANILLA | Tattered
Angels: LIMITED EDITION GLIMMER MIST - 2 oz. spray bottle
(Butternut Squash and Rum Punch) | Tsukineko:
Goosebumps Texture Spray - SHIMMER | Prima :
SAY IT IN CRYSTALS - PASSION
Instructions:
- Die cut the largest feather with vanilla cardstock, the smallest feather with brown cardstock, and the headpiece with brown cardstock.
- Spray the largest feather with Tattered Angels Glimmer Mist and set aside to dry. Ink the edges with a brown ink pad, if desired.
- Spray the smallest feather and headpiece with Goosebumps spray to give it a shiny look.
- Mat the brown headpiece strip to a piece of vanilla cardstock.
- Wrap the headpiece strip around napkins and adhere the two ends together (leave it a little loose so guests can slide off the napkin holder). Trim excess. Now you have a napkin ring!
- Adhere the feathers to the napkin ring.
- Attach a Prima Crystal to the feathers.
THANKS
Jars

Supplies:
K &
Company: TIM COFFEY HALLOWEEN & FALL 12X12 DESIGN PAPER PAD | Lifestyle
Crafts : SPLENDID | Bazzill
Basics : 12" x 12" Monochromatic Cardstock: BROWN | Lifestyle
Crafts : FOLIAGE | Kanban
Crafts : DUO MIRROR REFLECTIVE - COPPER/BLACK | Making
Memories : SCRAPBOOK EMBELLISHMENT STORAGE JARS - SMALL 6PK | Tim Holtz
ADIRONDACK METALLIC MIXATIVES PEARL & COPPER | Tsukineko:
Goosebumps Texture Spray - SHIMMER | Tulle
- Die cut “THANKS” out of Copper paper.
- Cut strips of paper from the Fall paper pack to wrap around the jars. Mat the fall paper with brown cardstock on every-other one.
- Spray strips of paper with Goosebumps to create a shimmer. Let dry.
- Die cut Foliage out of brown cardstock and adhere to the jars.
- Adhere “THANKS” to the jars on top of the foliage.
- Optional: The tops of these bottles were initially silver, but I wanted them copper to coordinate with the rest of the table. To fix this, I used alcohol ink to die them copper.
Cones
Cone Centerpieces
Designed for Oh My Crafts

Supplies Used:
Petersen-Arne : Craft Pedlers Paper Mache Set Cones Tall Kraft Set of 3 | Acrylic Paint - Bright White and Admiral Blue | Doodlebug : Sugar Coating Glitter | Silver Craft Wire | Red, White, Blue and Yellow Cardstock | Use any of these Cricut Cartridges to cut stars: A Child’s Year, Accent Essentials, Ashlyn’s Alphabet, Celebrations, Doodlecharms, Doodletype, Sesame Street Font, Simply Street, Pagoda, Hannah Montana, Home Décor, Indie Art, or Makin the Grade.

Instructions:
1. Paint the cones with 2-3 coats of red, white, or blue paint.
2. Glitter the cones.
a. If using glitter, apply mod podge or spray adhesive and then sprinkle on glitter.
b. If using spray paint, take outside, spray and let dry.
3. Punch a hole at the bottom of the cone and stick one end of wire into the hole. Bend the wire to secure it inside the cone.
 4. Wrap the wire around the cone so it spirals around the cone.
5. Cut stars out of red, white and blue paper with Cricut in various sizes ranging from ¾” to 5”. Embellish with Stickles, Mark Richards Metal Stickers and emboss with embossing folders.
6. Adhere stars to the wire using hot glue or Oh My Crafts: Exclusive Acid Free Craft Tape. These cones have the larger stars at the bottom of the cone and gradually gets smaller at the top.
Luminaries
Homemade Luminaries
Created for Oh My Crafts

Supplies Used:
Lifestyle Crafts : Yearbook - Paper Bag and Embossing Machine to cut | We R Memory Keepers : Yankee Doodles 12x12 Scrapbook Pad | Oh My Crafts : Exclusive OMC Acid Free Craft Tape - ¼”x 5 yards | Martha Stewart : Punch All Over the Page (Any punch would work such as Star or Starry Sky) | Embellishments : Doodlebug Ribbon Packs- Primary, Tattered Angels Glitter Spray, Stickles, Rub-ons, thread, etc... | Small LED Candle Lights

Instructions:
1. Die cut paper bag with patterned paper.
a. Lifestyle Crafts products work with most major embossing machines such as Cuttlebug, Big Shot, Vagabond, Grand Caliber, and Epic 6.
2. Before adhering the bag together, punch out an image using the Martha Stewart: All Over the Page punch. This image will provide a hole for the light to shine through.
3. Adhere Paper Bag together with craft tape.
4. Add any type of embellishments such as ribbon, Glitter Spray, stickles (takes time to dry), buttons, etc…
5. Finish by placing a LED light inside the bag and enjoying the great night time decoration or party favor.

Mailbox
Party Time Mailbox
Designed for Oh My Crafts

Supplies Used: Petersen-Arne : Craft Pedlers Paper Mache Box Mail Small Kraft | Oh My Vinyl : Ruby Glitter Vinyl | Cricut Cartridge : Designer’s Calendar | Oh My Crafts : My Color Acrylic Paint - Bright White and Major Brown | Tombow : Fastener Tabs (Velcro)
Instructions:
1. Paint mailbox white with brown ends. Apply 2-3 coats of paint.
2. Using Designer’s Calendar cut desired phrases at 5” with vinyl. When using the Cricut machine to cut vinyl, situate the settings with the blade depth 5 and low pressure.
TIP: If there is no shadow option available, create your own shadow by applying the cut image to the desired background color and trim around the edges leaving a ¼” border.
3. Cut two ¾”x 14” strips out of 12”x24” glitter vinyl.
4. Attach fastener tabs on both ends of each strip of vinyl and attach to the mailbox. Attach another fastener tab to the vinyl phrase and attach to the side of the mailbox.

5. Create your own flag by cutting out the flag using cardboard. Paint the flag, apply vinyl saying, and add trim around the edges.
TIP: Change out the side strips and phrase for different occasions such as an invitation holder for the 4th of July, a place to put gift cards for a Bridal Showers, a Valentine Mailbox, or a place to store Christmas Cards.
Thursday, October 13, 2011
Mummy Party Favors
Designed for Oh My Crafts
Designed for Oh My Crafts

Supplies
- Kit-Kat Bars (or Hershey’s)
- White Paper
- EKSuccess : SPOOKY EYES STICKERS
- Tim Holtz Distress Ink Pad: Vintage Photo
- Scotch Tape

Instructions:
1. Cut 1” strips of white paper
2. Tape four 1”x12” strips together
3. Ink the edges with brown ink
4. Tape one end of paper to the back of Kit-Kat
5. Wrap the paper around the Kit-Kat
6. When finished, tape the other end to the back of Kit-Kat
7. Apply the stinkin' cute spooky eyes
Saturday, October 8, 2011
Spider Invitation and Party Favor Box
Spider Invitation and Party Favor Box
Made with the Pen Holder
Designed for Oh My Crafts

When you buy a cutting machine such as the Cricut Expression or Eclips, you have the option of getting a pen holder too. The pen holder replaces the standard blade holder to accommodate any felt tip or ball point pen to draw a shape. I found this addition to be such a fun way to add that little extra
something to your images. I especially enjoyed using a glue pen, sprinkling glitter on it and then cutting out the same image as a "shadow" feature.
Here are instructions and tips for how to use the Eclips Pen Holder:
Supplies:
Instructions:
Step 1: Cut out image with Eclips
Machine
·
With Eclips press the Pop-up Menu and set to Center
Point.
o
Tip: The Center Point feature lets you cut
an image and then takes the blade back
to the “center point” so it will draw the image in the same position.
·
Press
Cut.
o
This
spider was cut out of heavy cardstock at 2 ½”.
Step 2: Draw
·
Replace
the cutting blade housing with the pen holder.
·
Set
the Materials Option to Pen Holder and specify whether you’re using a marker,
ball pt, or glue pen.
o
Tip:
You can also do this through the Pop-up Menu.
o
Warning:
If you do not change this setting it may damage the tip of your pen because the
settings for cutting apply more pressure than for drawing.
·
Keep
the setting at Center Point.
·
Press
“Cut” (and it will draw).
·
These
spiders show two different ways to use the pen holder.
1) With a marker. This spider was drawn with an American Crafts
Metallic Silver Marker.
2) With a glue pen. This spider was drawn with Quickie Glue Pen
and then sprinkled with Elizabeth Craft Design Glitter.
Step 3: Apply
·
Peel
off your spider from the mat and apply to a card or gift box.
o
The
paper used in these projects is K
& Company: KELLY PANACCI HALLOWEEN 12X12 SPECIALTY PAPER PAD
Thursday, October 6, 2011
Halloween Plates
Spooky Plates
Designed for Oh My Crafts


If you want an easy decor project that will grab everyone's attention, this project is just for you! All I did was cut out images with black vinyl and my electronic cutter (Silhouette) and then stuck the vinyl to silver chargers. With the silver as the background, it looks like the images are glowing! It is so easy to do (and) when you're done with the Halloween season, you can peel off the vinyl and use the chargers for your Thanksgiving dinner, or redecorate them with other holiday decor.
I love it!
I love it!
Advice: Use transfer tape to help you apply the vinyl in one piece to the chargers. Also, if you happen to get bubbles in the vinyl, use a little pin to poke the holes and release the air.
Friday, September 30, 2011
Fright Night Invite
Fright Night Invite
Designed for Oh My Crafts

Remember in the Phantom of the Opera movie when the phantom seals his envelope with wax to trademark his message? Creepy, but awesome! With this in mind, Lindsey and I had fun in the design room a few weeks ago trying to figure out a way the crafting world can do it with the products they own. Our conclusion: wax+heat+stamp.
Invitation Supplies and Instructions:
Supplies Used:
Doodlebug Card and Envelope (Available in black) | Martha Stewart : HALLOWEEN BORDERS | Martha Stewart : ELEGANT WITCH DESIGNER PAPER PAD | Tsukineko : VERSAFINE: Smoky Grey Ink Pad | Oh My Vinyl : STORMY GREY (1 Sheet 12" x 24") and Transfer Tape | Tim Holtz : Stamp Set - MINI MUSE
Doodlebug Card and Envelope (Available in black) | Martha Stewart : HALLOWEEN BORDERS | Martha Stewart : ELEGANT WITCH DESIGNER PAPER PAD | Tsukineko : VERSAFINE: Smoky Grey Ink Pad | Oh My Vinyl : STORMY GREY (1 Sheet 12" x 24") and Transfer Tape | Tim Holtz : Stamp Set - MINI MUSE

Instructions:
1. Trim the skull border so there are 3 skulls and adhere to top of Doodlebug Card.
2. Cut two 3 ½” x 4 ½” rectangles using Martha Stewart patterned paper, ink the edges with stormy grey, and adhere to card (one on the front and one on the inside).
3. Cut “Fright Night” out with Silhouette Machine and Stormy Grey Vinyl and use transfer tape to apply to front of card.
4. On the inside of the card, cut a square of cream colored cardstock, ink the edges and adhere to card.
5. Stamp the skull in the lower right corner with stormy grey ink pad.
1. Trim the skull border so there are 3 skulls and adhere to top of Doodlebug Card.
2. Cut two 3 ½” x 4 ½” rectangles using Martha Stewart patterned paper, ink the edges with stormy grey, and adhere to card (one on the front and one on the inside).
3. Cut “Fright Night” out with Silhouette Machine and Stormy Grey Vinyl and use transfer tape to apply to front of card.
4. On the inside of the card, cut a square of cream colored cardstock, ink the edges and adhere to card.
5. Stamp the skull in the lower right corner with stormy grey ink pad.
Phantom Seal

Supplies Used: Doodlebug Card and Envelope (Available in black) | Melt Art : BEESWAX-WHITE | Marvy Uchida - EMBOSSING HEAT TOOL | Tim Holtz : Stamp Set - MINI MUSE | Tattered Angels: MISTING MAT
Instructions:

Step 1. Lick envelope shut, pour about 2 tablespoons of wax into a container that will not melt when heat is applied, and with heat tool, melt wax entirely. Caution: Be careful when handling the container, it will be hot!

Step 2. While wax is still a liquid, pour over the seal of the envelope and
drop a stamp onto the wax. You do not need to press down on the stamp;
simply setting it in the wet wax will leave an image.


TIP: If you want to change the color of the wax, you must use a dye that is alcohol-based and not water-based such as Tim Holtz Alcohol Inks. Simply drip a few drops of the alcohol ink onto the wax before you have melted it and then follow the same directions as stated.
Wednesday, September 28, 2011
Skeleton Frame Display
Halloween
Décor Table Display
Designed for Oh My Crafts

Whether you’re decorating, crafting, or scrapbooking,
these Martha Stewart Crafts ™ and EK Success ™ Halloween products will excite
you all season. Create a spooky scene with these easy to assemble pre-glittered
and pre-cut candelabras, paper punches, mirror clings, skeleton keys and
classic Halloween designer paper.

Skeleton Key Frame Project


Supplies: EK
Success: Jolee’s Boutique- Skeleton Key Stickers or Martha Stewart: Skeleton Key
Embellishments | Martha
Stewart: Elegant Witch Designer Paper Pad | Bazzill
Paper: 12x12 Blackbird and Classic Purple | Bazzill
Basics: Perfectly Pleated: Blackbird or create your own with Bazzill cardstock
and Martha Stewart Scoring Board |
We R
Memory Keepers: Cinch Chipboard |
Making
Memories: Paper Reverie: Trim Card- Noir
Instructions:
1. Cut:
· Chipboard: 10 ½” x 10 ½”
· Dark Silver Glitter Cardstock: 8 ½” x 8 ½”
· Purple Cardstock: 6 ½” x 6 ½”
· Black Cardstock: 6 ¼” x 6 ¼”
· Silver Cardstock: 6” x 6”
2. Adhere:
a. Adhere the silver glitter, purple, black, and silver cardstock to the center of the chipboard.
b. Adhere the pleated paper around the edges.
1. Cut:
· Chipboard: 10 ½” x 10 ½”
· Dark Silver Glitter Cardstock: 8 ½” x 8 ½”
· Purple Cardstock: 6 ½” x 6 ½”
· Black Cardstock: 6 ¼” x 6 ¼”
· Silver Cardstock: 6” x 6”
2. Adhere:
a. Adhere the silver glitter, purple, black, and silver cardstock to the center of the chipboard.
b. Adhere the pleated paper around the edges.
Tip:
OMC sells Bazzill Basics’ premade pleated paper at an inexpensive price or you
can make your own by scoring cardstock in a ¾”, ¼”, ¾”, ¼” pattern and then folding
like an accordion.
c. Stick the skeleton keys on the silver cardstock in a funky pattern.
3. Tie ribbon:
a. Punch holes through the chipboard on the left and right side and tie ribbon/trim through.
c. Stick the skeleton keys on the silver cardstock in a funky pattern.
3. Tie ribbon:
a. Punch holes through the chipboard on the left and right side and tie ribbon/trim through.
Candelabras

Supplies:
Martha
Stewart: Creepy Glittered Candelabras
Instructions:
These stand-up candelabras from Martha
Stewart Crafts™ come pre-glittered and pre-cut for a no-mess way to add a
bewitching shimmer to your festivities. Simply unfold to stand. Makes two candelabras. Approximately 13"
high.
*** Also available Martha Stewart: Glittered Chandeliers ***
Bats

Supplies:
Martha
Stewart: Bat Window & Mirror Cling
Instructions:
Decorate for Halloween with these window
and mirror clings designed by Martha Stewart. The reusable adhesive allows for
these vinyl bats to be used year after year. This package includes twelve
self-clinging black bats in assorted sizes.
For this display, the backing was not removed and instead taped to the
wall and set on the table.
*** Also
available Martha Stewart: Spider Window & Mirror Cling
Spiderweb Table Trim

Supplies:
·
Martha
Stewart: Deep Double Edge Punch: Spiderweb
·
OMC
Bazzill Basics: 12” x24” Paper Multi-Packs: Black & White
Instructions:
With Martha Stewart Double Edge Punches
you can create your own party décor trim.
Simply punch the images out of 24” long paper. If you want longer trim, glue trims together.

*** Also
available: Martha Stewart: Skull & Crossbones and Scary Fence ***
Subscribe to:
Posts (Atom)