Showing posts with label Christmas. Show all posts

Tuesday, August 14, 2012

Lotion Boxes


Lotion Boxes
Designed for Oh My Crafts


Supplies: Box Template | Cardstock | Holiday Paper |Embellishments

Instructions:
1.     Use template to trace, cut and fold onto patterned paper.
a.     Cut on solid lines
b.     Score and fold on dotted
2.     Adhere box together with a strong adhesive.
3.     Create backboard by cutting cardstock 3” by desired height (depends on the lotion you’re gift wrapping).  The backboard should be slightly taller than the lotion. Attach it to the back of the lotion box.
4.     Embellish: Use Sizzix dies or layered chipboard to add dimension.


Here is the template for the lotion holder box. To open, click on the image and it should enlarge. Print the template on white cardstock. If the template does not enlarge or does not print to the correct size, you can email me with "Lotion Box Request" as your subject line to request a PDF version of the template.


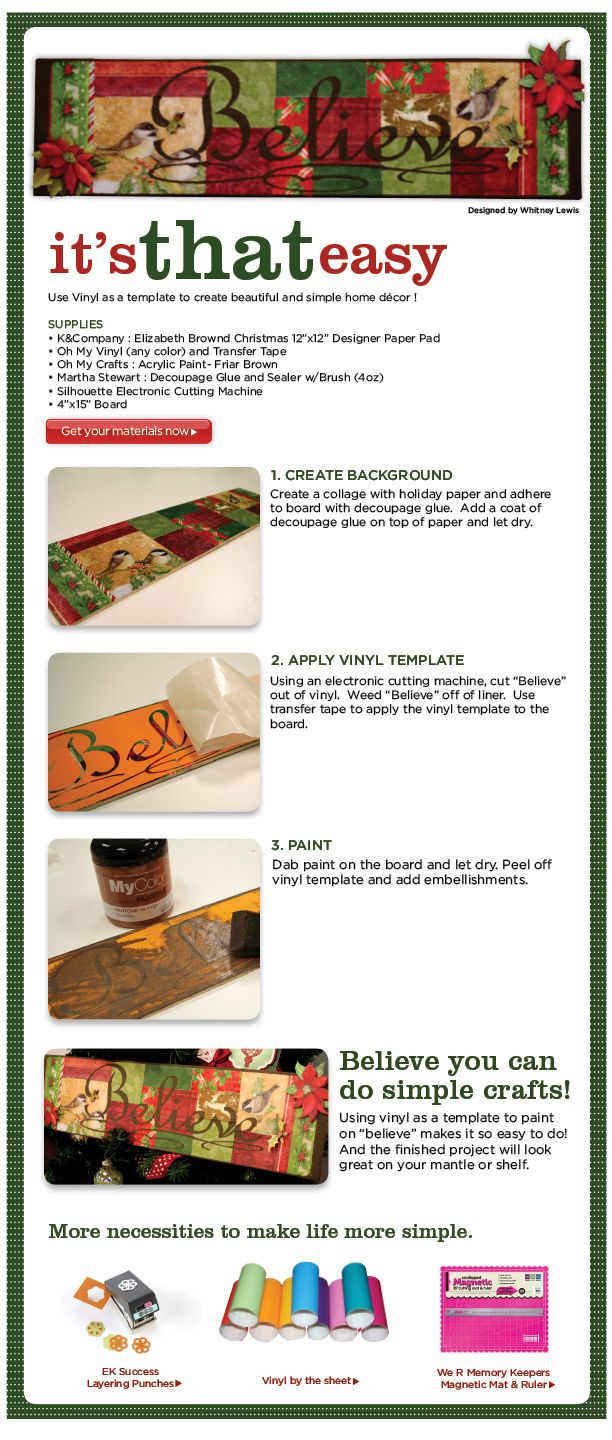
Believe It's That Easy


Milk for Santa Glass Etching Mug
Designed for Oh My Crafts

Supplies: Oh My Crafts Vinyl and Transfer Tape | Armour Etch Glass Cream and paintbrush | Glass Mug or other glass material | Electronic Cutting Machine (Silhouette)

      Instructions:
1.     Cut the image you would like to use as a stencil out of vinyl with any electronic cutter. 
This image was designed on Silhouette Studio and cut with the Silhouette machine.  “Milk for Santa” is the Elephants in Cherry Trees font (free downloadable font). 
2.     Weed away images from vinyl liner so you are left with the template.
3.     Apply transfer tape to vinyl and use it to transfer the vinyl onto glass surface.  Press the vinyl down firmly and peel off transfer tape.
Tip: Make sure there are no bubbles around the opening of the images.  Bubbles in the solid part of the vinyl do not matter.
6.      Clean the exposed part of the glass then apply a thick layer of etching cream.  Let the cream sit for about ten minutes.
7.      Rinse cream completely off with water and then take off the vinyl.  Clean the glass and you’re done! 

Behind the glass is Kanban Crafts’ Mirror Paper and a bag of hot chocolate.  Adding a solid behind the glass etching really makes the glass stand out.

How to make a personalized tag:

Supplies: Martha Stewart : Christmas Custom Stamp Set | Lifestyle Crafts : Nesting Rings |Lifestyle Crafts : Nesting Lace Circles |Bazzill Cardstock: Red, White and Green |Tim Holtz : Distress Ink Pad for Embossing | American Crafts : Zing! Embossing Powder: White | Marvy Uchida - EMBOSSING HEAT TOOL
Instructions:
Create your own personalized stamp with the Martha Stewart’s Christmas Custom Stamp Set.  It is great for monogram setting, address labels, personalized messages, greetings, and more!

For this tag I added the Oh My Crafts stamping letters to the acrylic block and stamped it with an embossing ink pad onto red paper, sprinkled white embossing powder and then heat set the embossing powder.

Next I used the Lifestyle Crafts Nesting Circles to cut a circle around the stamp and then added another circle frame out of white.  Finished it off by die cutting the Nesting Lace Circle out of green cardstock and tying it with ribbon to our Christmas treats.

Christmas Towel and Soap Dispenser


Santa’s Suit Hand Towel

Designed for Oh My Crafts

Supplies: Silhouette : Fabric Ink (Black and White) | Oh My Crafts Vinyl and Transfer Tape | Hand Towel
Instructions:
Step 1: Create a stencil with vinyl and apply it to fabric.  Use transfer tape to help apply the vinyl if needed.
For the Santa’s suit, cut two 1”x 24” strips of black vinyl and apply them across the bottom of the towel about 2” apart.  Also cut three 1” circles out of black vinyl and apply the “negative” to the center of the towel as if they were Santa’s buttons. For the belt, cut a square inside a square and set this aside.

Step 2: Use a foam brush to dab ink onto fabric. Be aware that the paint might seep through the fabric, so add paper behind the project to stop the extra ink.

Step 3: Allow ink to dry completely, remove vinyl stencil, and iron to set the ink.

Step 4: When layering colors, repeat steps.


Soap Dispenser Inserts
Designed for Oh My Crafts

Supplies:
Clear Plastic Paper or Packaging | Holiday Stamp  (specifically: Stampendous : Cling : World Christmas, Saint Nick and Snowbody Frame) | Ranger Ink : Archival Ink Pads | Clear Soap Dispenser (such as Pureworks : Antibacterial Foam 7 oz. , or Pureworks : Antibacterial Foam 2.5 oz.)| Un-Du : Sticker, Tape and Label Remover 4oz.

Instructions:
1.     Peel off any labels on the soap dispenser.  Use Un-Du to remove any sticky residue.
2.     Stamp a clear sheet of plastic with a stamp and an Archival Ink Pad. Archival Ink Pad are unique from many ink pads because they are alcohol based, which makes them waterproof.  This is why they will not rub off plastic or other gloss papers.
3.     Let dry for 30 minutes.
4.     Remove soap dispenser lid, roll plastic and fit it through the top of the Soap Dispenser.  It will naturally unroll and form to the inside of the soap dispenser. Put soap lid back on.
5.     Tie ribbon around dispenser.

Gingerbread House Gift Card Holder

Gingerbread House Card
Designed of Oh My Crafts


Instructions:

House:
  •         Die cut two houses out of light brown cardstock.
  •     Die cut the door and roof trims out of white glitter paper and adhere them to a house.
  •     Tie the two houses together with ribbon and adhere a strip of ribbon right above the door.

Lollipops:
  •         Punch 16 1” circles out of green (2), red (10), and white (4) glitter paper.
  •     Fold all the red and white circles in half and 2 green circles.
  •      Adhere four of the folded circles together to create dimensional semi-circle. Repeat to create 4 semi-circles.
  •      Cut out four 1/8”x 1” strips of white glitter cardstock and adhere next to the door.
  •         Adhere the dimensional semi-circles on top of the thin strips of white glitter cardstock.  Now you have your lollipops.

Wreath:
  •          Punch 8 1” circles out of green glitter paper.
  •         Pinch the corners of the green circles and adhere them to the top of the house in the shape of a wreath.
  •     Tie a red ribbon into a bow and adhere that to the bottom of the wreath.

Inside of Card:
  •        Adhere a 4”x3” cream colored cardstock on the inside of card for writing on.
  •        To create a pocket for a gift card:
  •     Cut 4”x2” brown cardstock and adhere to the left side of card on only the left, bottom, and right edges.  Leave the top edge open to slide the gift card in.
  •     Add embellishments such as ribbon.


Christmas Tree Card

Make Your Own Christmas Tree Card
Designed for Oh My Crafts


Supplies Used: Doodlebug : Mega Christmas Kit | Bazzill Basics : 12x12 Cardstock - Parakeet and Rainforest | Doodlebug : Create-a-Card - A2 Polka Dot | EK Success : Paper Punches - Scallop Diamond Edger, Dotted Scallop, Open Scallop, and Dotted Wave | My Minds Eye : Lime Twist Collection - Fly a Kite “Soar” Twine | Scrap piece of brown cardstock

Instructions:
1. Using Christmas-patterned paper, cut out 4 triangles. The largest triangle should be about 3”x3”x4” and then decrease the size proportionally from there.
2. Punch the bottom edge of each triangle with the paper punches.
3. Adhere the triangles together with the largest on bottom to create a tree.
4. Cut a 1” x 1” square of brown cardstock and adhere to the bottom.
5. Adhere the tree to the center of the card.
6. Tie a bow to the “family” sentiment and adhere to the top of the tree.

Dress the Halls with Holly

 Christmas Tag
 Designed for Oh My Crafts

Supplies Used: Sizzix : eclips Cartridge - Christmas & Tradition | Bazzill Basics : 12x12 Cardstock - Dark Green | Oh My Vinyl : Cherry Red and Olive | Ranger Ink : Stickles Glitter Glue - Christmas Red and Green


Instructions:

Cut out and assemble the following with the Eclips Machine:

Image
Feature
Size (height)
Material
Tag, Holly Frame
Pieces: solid
4 3/4"
Dark Green Cardstock
Tag, Holly Frame
Outline
4 3/4"
Cherry Red Vinyl
Tag, Holly Frame
Pieces: Holly with berries
4 3/4"
Olive Vinyl
Tag, Holly Frame
Pieces: Berries
4 3/4"
Cherry Red Vinyl

Add Stickles (glitter glue) to the holly to make it shine.

Hope, Peace, and COOKIES

Hope, Peace, and COOKIES
Designed for Oh My Crafts

Wouldn't this card be perfect with a tray full of gingerbread cookies?
 Supplies Used: Sizzix : Bigz Die - Gingerbread by Tim Holtz | Doodlebug : Mega Christmas Kit | Bazzill Basics : 12” x 12” Grasscloth Cardstock - Avalanche (white) and Walnut (brown)| Oh My Vinyl : Cloud White | 3L Foam Squares

Instructions:
1. Cut a 6” x 12” white rectangle and fold in half.
2. Cut a 5 ½” square of red dotted paper from Christmas Kit and adhere to front of card.
3. Die cut gingerbread man with light brown cardstock and add the glitter sticker trim from the Christmas Kit to the legs and arms. Adhere to card.
4. Adhere two red jewels from the Christmas Kit to the gingerbread man.
5. On white vinyl, place stickers from Christmas Kit to spell “Hope” and “Peace.” Trim around the borders. Adhere to top of card at an angle.
6. Cut out 7 white ¾” squares, and on each square add a letter to spell “COOKIES.”
7. Use foam squares to adhere “Cookies” to the bottom of the card.

Where the Tree Tops Glisten


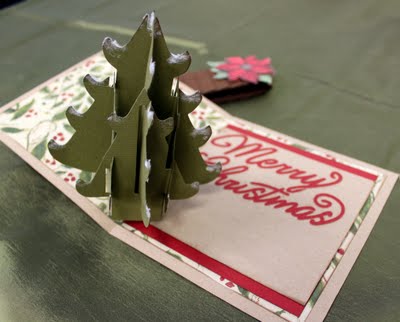
3-D Christmas Tree Card
Designed for Oh My Crafts

Supplies Used: Sizzix : Bigz XL Die - Tree, Christmas 3-D (Pop-Up)| K&Company : Glad Tidings - Designer Paper Pad | K&Company : Glad Tidings - Poinsettia & Holly Layered Accents | Bazzill Basics : 12” x 12” Smoothies Cardstock - Kraft | Bazzill Basics : 12” x 12” Criss Cross Cardstock - Kisses (red) and Saguaro (green) | Bazzill Basics : Perfectly Pleated - Pinecone | Sizzix : eclips Cartridge - Christmas & Traditions (Phrase “Merry Christmas”) | Our Craft Lounge : Sparkly Fluff - Sugar (white)


Instructions:
1. Die cut tree with green cardstock and assemble according to Sizzix instructions. Dab the tips of the tree with a little bit of glue and then sprinkle Sparkly Fluff on the glue to make it look like snow. Set aside to dry.
2. Cut 10 ½” x 5 ½” of Kraft paper and fold in half.
3. With patterned paper cut a 5” x 5” square and 10” x 5” rectangle. If desired, ink the edges. Adhere the square to the front of the card and the rectangle to the inside of the card.
4. Cut 4 ½” x 4 ½” square of red cardstock and adhere to the right side of the card.
5. Cut 4” x 4 ½” rectangle of kraft cardstock and adhere on top of the red cardstock.
6. Cut out “Merry Christmas” with the eclips Machine and red cardstock at size: 1 ½” and adhere to page.
7. Adhere the Christmas tree to the inside of the card across the fold.
8. With the card closed, wrap the brown pleated paper around the card and adhere it together so it will keep the card closed but slide off easily. Trim off any excess pleats.
9. Adhere a poinsettia to the right side of the pleated wrap.