Showing posts with label Cards. Show all posts

Tuesday, August 14, 2012

Card for the Grad


Happy Graduation Card


Supplies Used: 

Bazzill Basics : White 12”x12” Cardstock  | SEI : Velvet Paper Assortment  | Lifestyle Crafts : Yearbook - Diploma, Grad Cap, and Stacked Books  | Spellbinders : Nestabilities - Classic Squares Small  | Martha Stewart : Punch Around the Page - French Scroll  | My Pink Stamper : Happiest Moments  | Imaginisce : Glam Rocks - Black and I-Rock Tool  | Tim Holtz : Distress Ink Pad - Vintage Photo 


Instructions  

1. Cut white paper 8 ½” (height) x 7” (long) and score at 3 ¾” (height) and fold.  
2. Cut a 6 ¾” x 3 ¼” rectangle of dark blue paper and punch around the borders using the Martha Stewart punch. Adhere to the front, shorter flap of card.
3.  Die cut and emboss 3 medium squares with Spellbinders Nestabilites and white paper. Adhere on dark blue rectangle. 4. Die cut Lifestyle Craft dies with velvet paper and white paper. For the tassel and ribbon around the diploma, tie on floss instead of the die cut. For the white diploma and book pages, ink them lightly. Adhere the books, grad cap, and diploma die cuts to the squares.  
5. Stamp “Happy Graduation” on smooth white paper with black ink and trim around the edges. Frame with navy blue paper. Adhere to the bottom of the card, so half of it is hanging off the card.  
6. With i-rock heat tool, add glam rocks on the punched borders and to the left and right of “Happy Graduation.”  
7. Punch a 7” strip with the same Martha Stewart punch and blue paper. Adhere to the inside of the card ¾” from the bottom so it doesn’t show when the card is closed. 
Enjoy the Journey Card
Designed for Oh My Crafts


Supplies Used:

Cuttlebug : Harlequin Embossing Folder  | 
Bazzill Basics : Basic Grey - Lauderdale Paper Pack

Instructions:
 
1. Cut an 8 1/2” x 11” smooth white paper in half (hamburger style) and fold in half (hamburger style again) to form a card.  
2. With four colors of paper and medium sized diamond cutting die (Harlequin), die cut 8 diamonds (2 diamonds per color). 
3. Starting at the top, adhere 2 diamonds on the card so the two meet in the center and the tips are almost touching. From there leave a little bit of white space between each diamond and adhere the rest of the diamonds. The diamonds won’t fit exactly on the page so trim the tips hanging off the edges. 
4. Die cut one large diamond (Harlequin). 
5. With white embossing powder, emboss sentiment on light colored paper and trim a rectangle around the sentiment.  
6. Adhere sentiment to large diamond and place in the center of the card with foam squares.  
7. Die cut flowers and leaves (Harlequin) and form a flower using a brad for the center and adhere to upper right corner of sentiment.  
8. With stickles, squeeze three dots to left of sentiment and squeeze dots on the flower petals.  
9. Squeeze yellow metal corners to bottom of card.  
10. On the inside of the card, decorate with more flowers from Harlequin. 

Baby Boy Hippo Card

Hip, Hip, HOORAY!
Designed for Oh My Crafts

Supplies Used:


Slice Design Card : Zootopia Bazzill Cardstock :      Night Blues - Powder and Splash      Bright Greens - Limeade     Browns - Bark     Black and Whites - Bazzill White Imaginisce : Boy Oh Boy - Little Cuties Patterned PaperClearsnap : Colorbox Ink Pad - Cape CodTim Holtz : Distress Ink Pad - Pumice StoneLifestyle Crafts : Fresh Start Cutting Dies - DiamondsQuickie Glue Pen

Instructions:
1. Cut 10x5 ½” smooth white cardstock and fold in half for the card base 
2. Cut 5x5 ½”green cardstock and distress edges ink pad. Adhere to front of card.
3. Cut 4 ½ x 5” brown cardstock. Adhere to center of card. 
4. Cut 1 ¼ inch strip of patterned paper. Create pleats by folding the strip back and forth. Trim pleat to 5 ½” and adhere ¼” from bottom of card.
TIP: Double sided tape works best to adhere the folded paper. 

5. Die cut two rows of diamonds out of green cardstock. With two rows of three on top of each other, cut the rows apart and glue one diamond on top of the other so you have 5 diamonds going across. Distress with brown ink pad. 
6. With Slice machine, cut two hippo heads at 2” with dark blue cardstock and two snouts at 2” with lighter blue cardstock. Adhere white cardstock to the back of the hippos for the teeth and eyes. Ink the edges of the hippos with blue ink pad. Adhere snouts to heads and attach hippos to card with foam squares.
7. Cut out “+” out of blue cardstock and adhere between hippos. 
8. With Slice machine, cut “Hooray” at 1” with blue cardstock and distress with blue ink pad. Adhere on diamonds with Quickie Glue pen. 
9. Adhere diamonds to top of border.

To Love and Cherish Card

To Love and Cherish Card
Designed for Oh My Crafts


Supplies: Imaginisce : To Love and Cherish: Paper Pack | Imaginisce : Roly Rosies- Neutrals | Imaginisce : Petal Roller | Imaginisce : I-rock Tool | Imaginisce : Glam Rocks- Mirror | Spellbinders : Nestabilities - Fleur De Lis Squares | Bazzill Basics : White and Dark Red Cardstock | Oh My Vinyl : Cherry Red, Ebony, Transfer Tape | Cricut Cartridge : Tie the Knot | Martha Stewart : Scoring board | Tsukineko : Versafine Ink Pad - Onyx Black

Instructions:

1. Cut 5 ¾” x 12” of black pin stripe paper and score at 3” and 9.” Fold flaps along scored lines toward each other.
2. Cut 5 ¼” x 5 ¼” red cardstock and distress edges black. Cut in half and adhere to front of card.
3. Die cut and emboss largest Fleur De Lis Square from Spellbinders with black and white polka dot paper. Cut in half from one corner to the next. Adhere like a diamond on top of red paper.
4. Roll 1 large and two small black Imaginisce flowers with the petal roller. Adhere petal portion to base of flower so the rolls stay together. Tip - Start with the outside of the flower and roll toward the center so you are left with a base to glue the flower on. Hot glue works best.
5. With I-rock tool, and small flourishes template, adhere mirror glam rocks to each side of card so they look like flourishes.

Don't you love these flowers from Imaginisce?  They were so easy to make and they go perfect with this paper pack.

6. Adhere two small flowers on the right flap and one large flower on the left.
7. For inside of card: Cut 5 ¾” x 6” of smooth white paper and adhere to inside center of card.
8. With the Tie the Knot Cricut Cartridge, set at 1 ¾”, medium pressure, and high speed, cut “Celebrate” out of black vinyl and the flourish with red vinyl. Use transfer tape to adhere to top of white paper and finish by embellishing with I-rock.

Gingerbread House Gift Card Holder

Gingerbread House Card
Designed of Oh My Crafts


Instructions:

House:
  •         Die cut two houses out of light brown cardstock.
  •     Die cut the door and roof trims out of white glitter paper and adhere them to a house.
  •     Tie the two houses together with ribbon and adhere a strip of ribbon right above the door.

Lollipops:
  •         Punch 16 1” circles out of green (2), red (10), and white (4) glitter paper.
  •     Fold all the red and white circles in half and 2 green circles.
  •      Adhere four of the folded circles together to create dimensional semi-circle. Repeat to create 4 semi-circles.
  •      Cut out four 1/8”x 1” strips of white glitter cardstock and adhere next to the door.
  •         Adhere the dimensional semi-circles on top of the thin strips of white glitter cardstock.  Now you have your lollipops.

Wreath:
  •          Punch 8 1” circles out of green glitter paper.
  •         Pinch the corners of the green circles and adhere them to the top of the house in the shape of a wreath.
  •     Tie a red ribbon into a bow and adhere that to the bottom of the wreath.

Inside of Card:
  •        Adhere a 4”x3” cream colored cardstock on the inside of card for writing on.
  •        To create a pocket for a gift card:
  •     Cut 4”x2” brown cardstock and adhere to the left side of card on only the left, bottom, and right edges.  Leave the top edge open to slide the gift card in.
  •     Add embellishments such as ribbon.


Christmas Tree Card

Make Your Own Christmas Tree Card
Designed for Oh My Crafts


Supplies Used: Doodlebug : Mega Christmas Kit | Bazzill Basics : 12x12 Cardstock - Parakeet and Rainforest | Doodlebug : Create-a-Card - A2 Polka Dot | EK Success : Paper Punches - Scallop Diamond Edger, Dotted Scallop, Open Scallop, and Dotted Wave | My Minds Eye : Lime Twist Collection - Fly a Kite “Soar” Twine | Scrap piece of brown cardstock

Instructions:
1. Using Christmas-patterned paper, cut out 4 triangles. The largest triangle should be about 3”x3”x4” and then decrease the size proportionally from there.
2. Punch the bottom edge of each triangle with the paper punches.
3. Adhere the triangles together with the largest on bottom to create a tree.
4. Cut a 1” x 1” square of brown cardstock and adhere to the bottom.
5. Adhere the tree to the center of the card.
6. Tie a bow to the “family” sentiment and adhere to the top of the tree.

Dress the Halls with Holly

 Christmas Tag
 Designed for Oh My Crafts

Supplies Used: Sizzix : eclips Cartridge - Christmas & Tradition | Bazzill Basics : 12x12 Cardstock - Dark Green | Oh My Vinyl : Cherry Red and Olive | Ranger Ink : Stickles Glitter Glue - Christmas Red and Green


Instructions:

Cut out and assemble the following with the Eclips Machine:

Image
Feature
Size (height)
Material
Tag, Holly Frame
Pieces: solid
4 3/4"
Dark Green Cardstock
Tag, Holly Frame
Outline
4 3/4"
Cherry Red Vinyl
Tag, Holly Frame
Pieces: Holly with berries
4 3/4"
Olive Vinyl
Tag, Holly Frame
Pieces: Berries
4 3/4"
Cherry Red Vinyl

Add Stickles (glitter glue) to the holly to make it shine.

Hope, Peace, and COOKIES

Hope, Peace, and COOKIES
Designed for Oh My Crafts

Wouldn't this card be perfect with a tray full of gingerbread cookies?
 Supplies Used: Sizzix : Bigz Die - Gingerbread by Tim Holtz | Doodlebug : Mega Christmas Kit | Bazzill Basics : 12” x 12” Grasscloth Cardstock - Avalanche (white) and Walnut (brown)| Oh My Vinyl : Cloud White | 3L Foam Squares

Instructions:
1. Cut a 6” x 12” white rectangle and fold in half.
2. Cut a 5 ½” square of red dotted paper from Christmas Kit and adhere to front of card.
3. Die cut gingerbread man with light brown cardstock and add the glitter sticker trim from the Christmas Kit to the legs and arms. Adhere to card.
4. Adhere two red jewels from the Christmas Kit to the gingerbread man.
5. On white vinyl, place stickers from Christmas Kit to spell “Hope” and “Peace.” Trim around the borders. Adhere to top of card at an angle.
6. Cut out 7 white ¾” squares, and on each square add a letter to spell “COOKIES.”
7. Use foam squares to adhere “Cookies” to the bottom of the card.

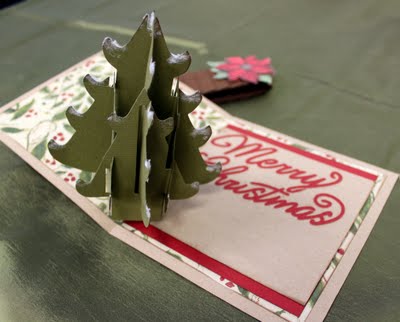
Where the Tree Tops Glisten


3-D Christmas Tree Card
Designed for Oh My Crafts

Supplies Used: Sizzix : Bigz XL Die - Tree, Christmas 3-D (Pop-Up)| K&Company : Glad Tidings - Designer Paper Pad | K&Company : Glad Tidings - Poinsettia & Holly Layered Accents | Bazzill Basics : 12” x 12” Smoothies Cardstock - Kraft | Bazzill Basics : 12” x 12” Criss Cross Cardstock - Kisses (red) and Saguaro (green) | Bazzill Basics : Perfectly Pleated - Pinecone | Sizzix : eclips Cartridge - Christmas & Traditions (Phrase “Merry Christmas”) | Our Craft Lounge : Sparkly Fluff - Sugar (white)


Instructions:
1. Die cut tree with green cardstock and assemble according to Sizzix instructions. Dab the tips of the tree with a little bit of glue and then sprinkle Sparkly Fluff on the glue to make it look like snow. Set aside to dry.
2. Cut 10 ½” x 5 ½” of Kraft paper and fold in half.
3. With patterned paper cut a 5” x 5” square and 10” x 5” rectangle. If desired, ink the edges. Adhere the square to the front of the card and the rectangle to the inside of the card.
4. Cut 4 ½” x 4 ½” square of red cardstock and adhere to the right side of the card.
5. Cut 4” x 4 ½” rectangle of kraft cardstock and adhere on top of the red cardstock.
6. Cut out “Merry Christmas” with the eclips Machine and red cardstock at size: 1 ½” and adhere to page.
7. Adhere the Christmas tree to the inside of the card across the fold.
8. With the card closed, wrap the brown pleated paper around the card and adhere it together so it will keep the card closed but slide off easily. Trim off any excess pleats.
9. Adhere a poinsettia to the right side of the pleated wrap.

Color Wash Tags


Color Wash Tag Technique
Designed for Oh My Crafts 


All Boy Tag Supplies:
Inkssentials Surfaces Manila Craft Tags #5 | Ranger Ink: Adirondack Color Wash: Cranberry, Sunset Orange, Butterscotch, Denim, Lettuce, and Purple Twilight | Unity Stamp Company: Sketchy Little Boy | Tsukineko: Versamark Dazzle Stamp Pad | Melt Art: Ultra Thick Embossing Enamel | Basic Grey: Life of the Party: Felt Stickers- Woolies | We R Memory Keepers: Crop-A-Dile III: Corners: Fun Painted Silver


Friend Tag Supplies:
Inkssentials Surfaces Manila Craft Tags #5 | Adirondack Color Wash: Purple Twilight | Tattered Angels: Glimmer Mist: Cranberry Zing and Pink Bubblegum | Unity Stamp Company: Girl of the Moment | Bazzill Basics: Perfectly Pleated: Fussy (sprayed with purple color wash)


Instructions:
1.       Stamp images on manila tag with Versamark ink pad and heat emboss with clear embossing powder. 
2.       Spray desired colors of Adirondack color wash over the embossed tag.
a.       Tip: Both the Adirondack Color Wash and Tattered Angels sprays blend well with each other because they are water-based.  However, notice that the Adirondack Color Wash is very vibrant whereas the Tattered Angels Glimmer Mist is more translucent.
b.      Note:  Use the ‘Color Catcher’ box (sold at OMC) for an easy way to keep the sprays contained in one area.
3.       Blend the colors by misting water over the wet tag.
a.       Tip: Tim Holtz Ranger Mini Mister filled with water is a great tool to have on hand for this project.
4.       Finish by adding any embellishments such as metal corners, bows, pleats, or buttons.

Life is a Journey Card

Journey Card
Designed for Oh My Crafts
Can you believe this airplane was made with a stamp?  Pretty cool, isn't it?
Thank you metallic embossing powder.

Supplies Used: Doodlebug : Square Grid Card - Beetle Black | Tim Holtz : Crowded Attic Paper Pack | Tim Holtz Stamp: Air Travel | Tim Holtz : Distress Ink Pads - Forest Moss, Brushed Corduroy, and Rusty Hinge | Tim Holtz : Embossing Ink Pad | Tim Holtz : Hitch Fastener | Karen Foster : Tawny Scrapper’s Spools (floss) | 7 Gypsies : Danglers Charm | Marvy Uchida : Heat Gun | American Crafts : Zing Embossing Powder - Gold Metallic | 3L Foam Squares

Instructions:

1. Cut about ten 1 ½ x 1 ½” squares using your favorite paper from Tim Holtz paper pack and distress with colored ink pads.
2. Adhere squares to card, leaving center empty.
3. On back of front page, adhere 4 ¾” x 4 ¾” patterned paper so a desired color shows in front through window.
4. Cut four pieces of floss 7” long.
5. Adhere floss to back of card and then cover with a 4 ¾” x 4 ¾” patterned paper.
6. Attach Hitch Fastener to front and tie the floss around it. Trim floss as needed.
7. Stamp the plane on separate piece of Tim Holtz paper with embossing ink and emboss with gold powder. Cut around the borders of plane.
8. Adhere plane with pop-up squares.
9. Distress all the edges of card.
10. Attach “Journey” Charm to the floss.

Sweet Little One Card

                                    Baby Girl Card
                                   Designed for Oh My Crafts 


Supplies Used: Doodlebug : Create-A-Card Rainbow Set - Square Baroque Card & Envelope | Doodlebug : Ribbon Packs - Stitched Grosgrain | Doodlebug : Whimsy Wafers Chipboard Sticker Pack | Doodlebug : Sugar Coating Glitter | Quickie Glue Pen


Instructions:


1. With Quickie Glue Pen, draw a line around the white border and cover with pink glitter.

2. Add pink corners to the right side from Whimsy Wafers Chipboard Sticker Pack.


3. Add stroller chipboard sticker inside the frame with two pink brads.

4. Thread green grosgrain ribbon through the “Little One” chipboard sticker, wrap around the entire card and tie bow on the right side. Fray the ends.

Life is Good

Life is Good Card:
Featuring a Fun Stamping Technique
 Designed for Oh My Crafts


Supplies: Tim Holtz : Stamp Set - Sketch Elements | K&Company : Abrianna 12x12 Designer Paper Pad | Tim Holtz : Distress Ink Pad - Mustard Seed, Crushed Olive, Vintage Photo, Victorian Velvet | Prima : Paloma Collection - Madeline | Spellbinders : Nestabilities - Reverse Wonky Rectangles | White Cardstock


Instructions:

1. Die cut 3 Wonky Rectangles with Abrianna designer paper and ink the edges.
2. Die cut 1 smaller Wonky Rectangle with white cardstock and ink the edges.
3. With a flourish stamp, stamp the flourish on the white rectangle twice. First with yellow and the second time with green. When stamping the second time, slightly misalign the stamp so there is a slight shadow of the first stamp that shows through. This gives your stamp a little more visual depth and interest.
4. Adhere rectangles to white 7”x5” paper “as if cards were falling.”
5. Adhere a prima flower over the flourish
6. Stamp “Life is Good” with Victorian Velvet ink pad.

I'll Bee Here For You Card

I'll Bee Here For You Card
Designed for Oh My Crafts

Supplies Used: 
Doodlebug : Create-A-Card Rainbow Set - A6 Swiss Dot Card and Envelope | Black, Yellow, and smooth white paper | Sizzix : Bigz Die - Fanciful Flight by Tim Holtz | Viva Décor : Pearl Pen - Kiwi and Black | My Pink Stamper : Tweetie Hoo Puns and Black Ink | Foam Squares


Instructions:
1. Using Fanciful Flight Die, cut out a bumble bee using the two smaller wings, the body and the wing backgrounds with black and pale yellow paper. Adhere to the top right corner of card with foam squares.


Tip: Add Mod Podge or crackle paint over the assembled bee to create a shiny finish.

2. Stamp “I’ll bee here for you!” on smooth white paper and trim around the edges. Adhere to black paper and trim, creating a thin border. Adhere to bottom left corner of card.
3. With Viva Décor Pearl Pen, create a stem and leaf by adding green dots down from the flower.
4. Again, with Viva Décor Pearl Pen, add black dots along the scalloped border of the envelope. Set aside to let dry.

Friday, September 30, 2011

Fright Night Invite

Fright Night Invite
Designed for Oh My Crafts
Remember in the Phantom of the Opera movie when the phantom seals his envelope with wax to trademark his message?  Creepy, but awesome!  With this in mind, Lindsey and I had fun in the design room a few weeks ago trying to figure out a way the crafting world can do it with the products they own.  Our conclusion: wax+heat+stamp.  

Invitation Supplies and Instructions: 
 
Instructions:
1. Trim the skull border so there are 3 skulls and adhere to top of Doodlebug Card.
2. Cut two 3 ½” x 4 ½” rectangles using Martha Stewart patterned paper, ink the edges with stormy grey, and adhere to card (one on the front and one on the inside).

3. Cut “Fright Night” out with Silhouette Machine and Stormy Grey Vinyl and use transfer tape to apply to front of card.
4. On the inside of the card, cut a square of cream colored cardstock, ink the edges and adhere to card.
5. Stamp the skull in the lower right corner with stormy grey ink pad. 

Phantom Seal


Instructions: 


Step 1. Lick envelope shut, pour about 2 tablespoons of wax into a container that will not melt when heat is applied, and with heat tool, melt wax entirely.  Caution: Be careful when handling the container, it will be hot!
Step 2.  While wax is still a liquid, pour over the seal of the envelope and drop a stamp onto the wax. You do not need to press down on the stamp; simply setting it in the wet wax will leave an image.

Step 3. Wait until the wax is entirely cooled down and then remove the stamp. Placing the envelope in the freezer will help the wax cool down quicker.


TIP: If you want to change the color of the wax, you must use a dye that is alcohol-based and not water-based such as Tim Holtz Alcohol Inks. Simply drip a few drops of the alcohol ink onto the wax before you have melted it and then follow the same directions as stated.


Thursday, September 29, 2011


Technique: How to Use Sequins on Cards
Designed for Oh My Crafts


Supplies:

Instructions:
1.       Trim the double-sided adhesive sheet to the desired size
and peel off one liner from the double-sided adhesive sheet.
2.       Press sequins onto the sticky side of adhesive sheet.
3.       Trim the sequins that hang off the edge with a paper trimmer.
4.       Peel off the other liner of the double-sided adhesive sheet.
5.       Apply to card or envelope.
Voila!  Cute and easy (: