
Saturday, October 29, 2011
Friday, October 28, 2011

Thursday, October 13, 2011
Mummy Party Favors
Designed for Oh My Crafts
Designed for Oh My Crafts

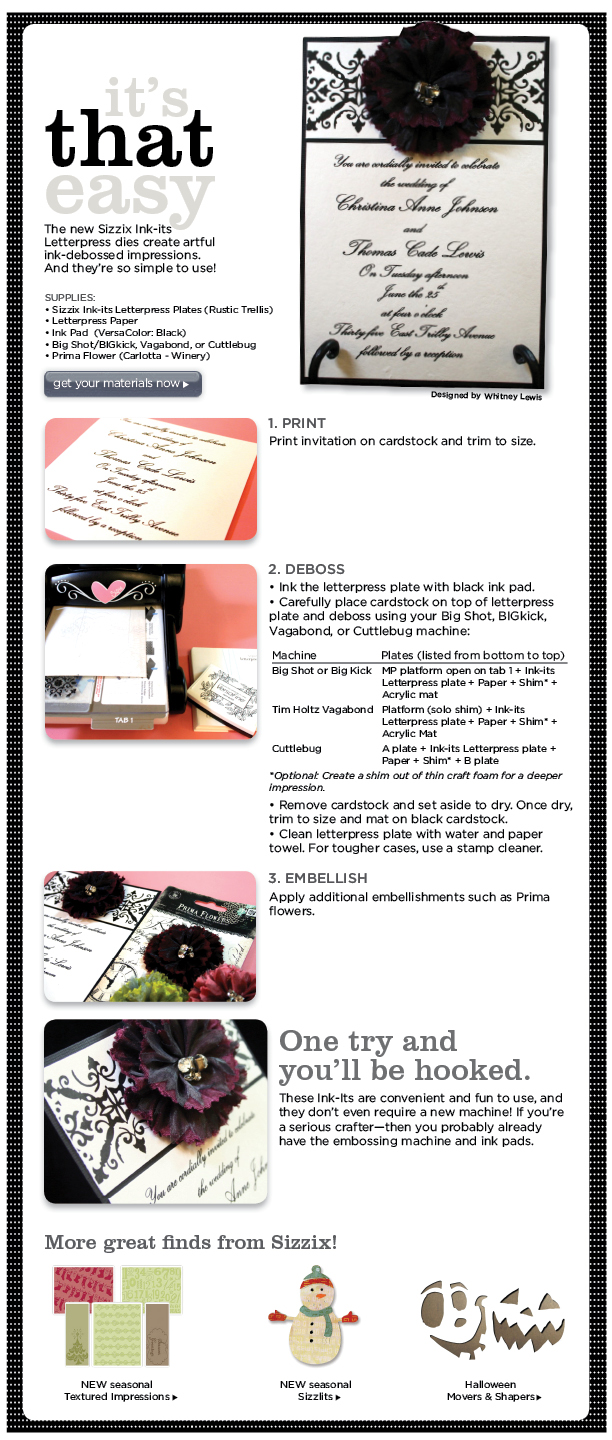
Supplies
- Kit-Kat Bars (or Hershey’s)
- White Paper
- EKSuccess : SPOOKY EYES STICKERS
- Tim Holtz Distress Ink Pad: Vintage Photo
- Scotch Tape

Instructions:
1. Cut 1” strips of white paper
2. Tape four 1”x12” strips together
3. Ink the edges with brown ink
4. Tape one end of paper to the back of Kit-Kat
5. Wrap the paper around the Kit-Kat
6. When finished, tape the other end to the back of Kit-Kat
7. Apply the stinkin' cute spooky eyes
Saturday, October 8, 2011
Spider Invitation and Party Favor Box
Spider Invitation and Party Favor Box
Made with the Pen Holder
Designed for Oh My Crafts

When you buy a cutting machine such as the Cricut Expression or Eclips, you have the option of getting a pen holder too. The pen holder replaces the standard blade holder to accommodate any felt tip or ball point pen to draw a shape. I found this addition to be such a fun way to add that little extra
something to your images. I especially enjoyed using a glue pen, sprinkling glitter on it and then cutting out the same image as a "shadow" feature.
Here are instructions and tips for how to use the Eclips Pen Holder:
Supplies:
Instructions:
Step 1: Cut out image with Eclips
Machine
·
With Eclips press the Pop-up Menu and set to Center
Point.
o
Tip: The Center Point feature lets you cut
an image and then takes the blade back
to the “center point” so it will draw the image in the same position.
·
Press
Cut.
o
This
spider was cut out of heavy cardstock at 2 ½”.
Step 2: Draw
·
Replace
the cutting blade housing with the pen holder.
·
Set
the Materials Option to Pen Holder and specify whether you’re using a marker,
ball pt, or glue pen.
o
Tip:
You can also do this through the Pop-up Menu.
o
Warning:
If you do not change this setting it may damage the tip of your pen because the
settings for cutting apply more pressure than for drawing.
·
Keep
the setting at Center Point.
·
Press
“Cut” (and it will draw).
·
These
spiders show two different ways to use the pen holder.
1) With a marker. This spider was drawn with an American Crafts
Metallic Silver Marker.
2) With a glue pen. This spider was drawn with Quickie Glue Pen
and then sprinkled with Elizabeth Craft Design Glitter.
Step 3: Apply
·
Peel
off your spider from the mat and apply to a card or gift box.
o
The
paper used in these projects is K
& Company: KELLY PANACCI HALLOWEEN 12X12 SPECIALTY PAPER PAD
Thursday, October 6, 2011
Halloween Plates
Spooky Plates
Designed for Oh My Crafts


If you want an easy decor project that will grab everyone's attention, this project is just for you! All I did was cut out images with black vinyl and my electronic cutter (Silhouette) and then stuck the vinyl to silver chargers. With the silver as the background, it looks like the images are glowing! It is so easy to do (and) when you're done with the Halloween season, you can peel off the vinyl and use the chargers for your Thanksgiving dinner, or redecorate them with other holiday decor.
I love it!
I love it!
Advice: Use transfer tape to help you apply the vinyl in one piece to the chargers. Also, if you happen to get bubbles in the vinyl, use a little pin to poke the holes and release the air.
Subscribe to:
Posts (Atom)