Showing posts with label Holiday. Show all posts

Tuesday, August 14, 2012


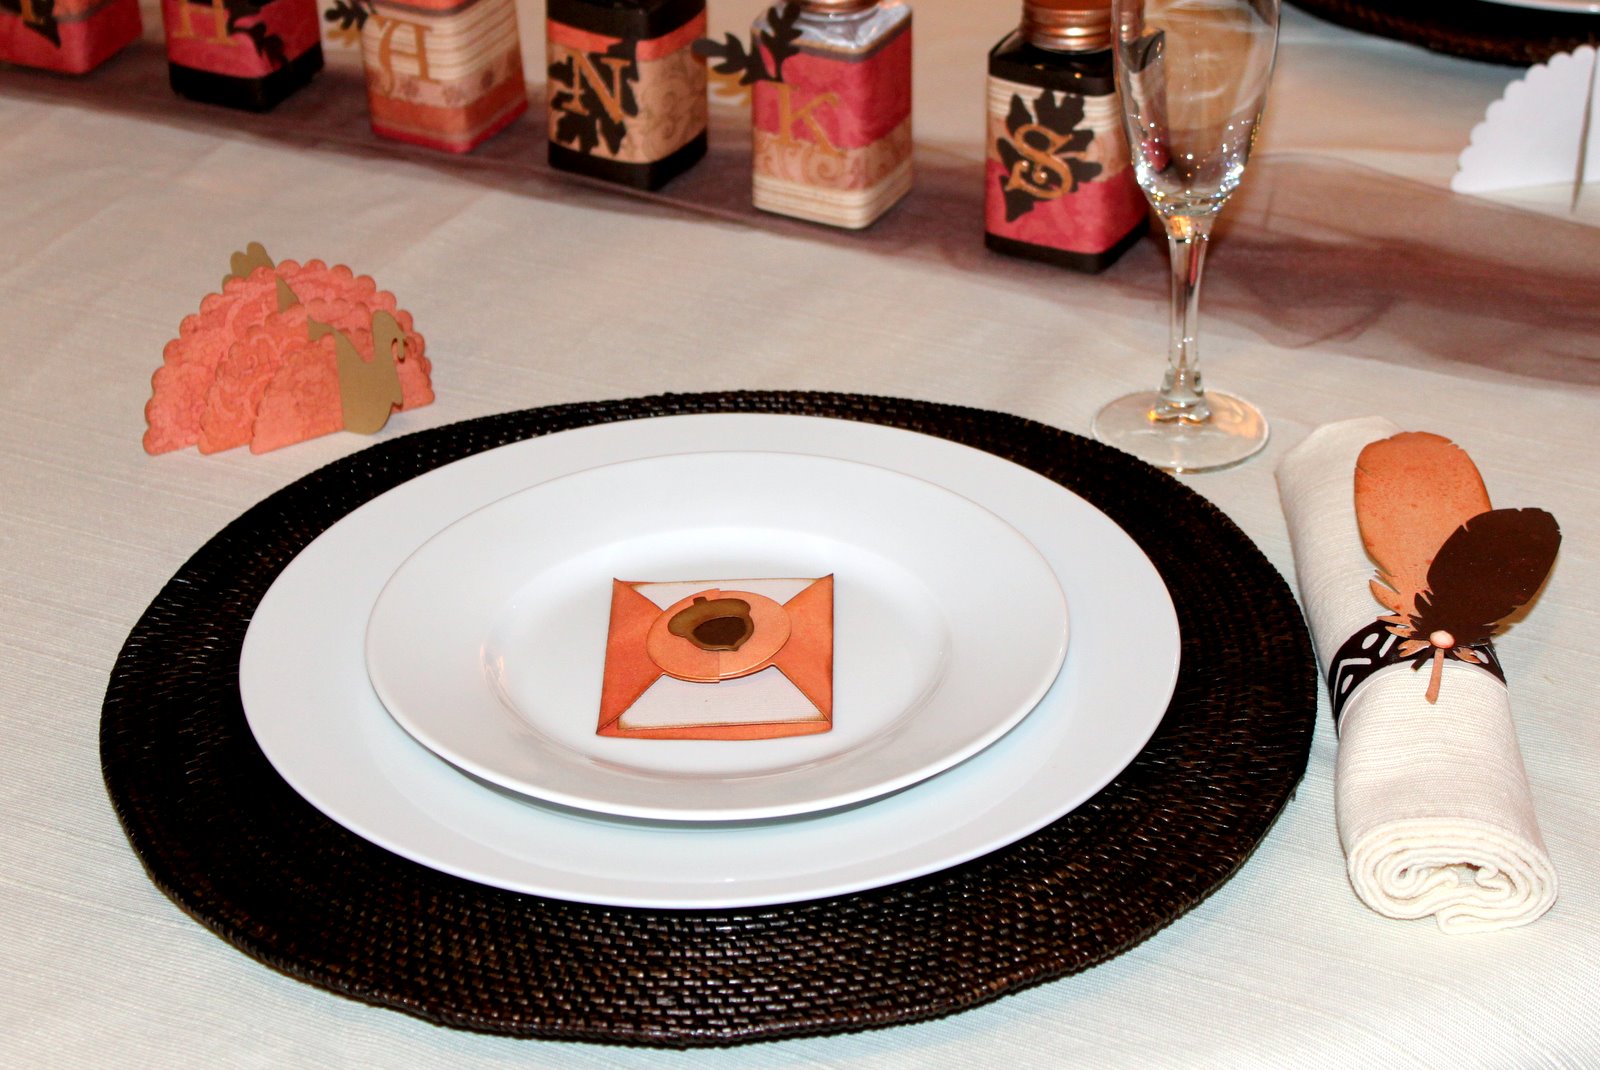
Thanksgiving Table Decor
Featuring Lifestyle Crafts “Be Stuffed” Dies
Designed for Oh My Crafts


Paper Turkey

Supplies:


Instructions:
  • Die cut Turkey wings with the Epic 6, Big Shot/BigKICK, Vagabond, or Cuttlebug machine and paper from the Fall paper pack.
  • Die cut Turkey body with Kraft paper.
  • Place wings into the slits of the body.
  • Optional: Ink the edges of the turkey with a brown ink pad, if desired.  


Place Cards
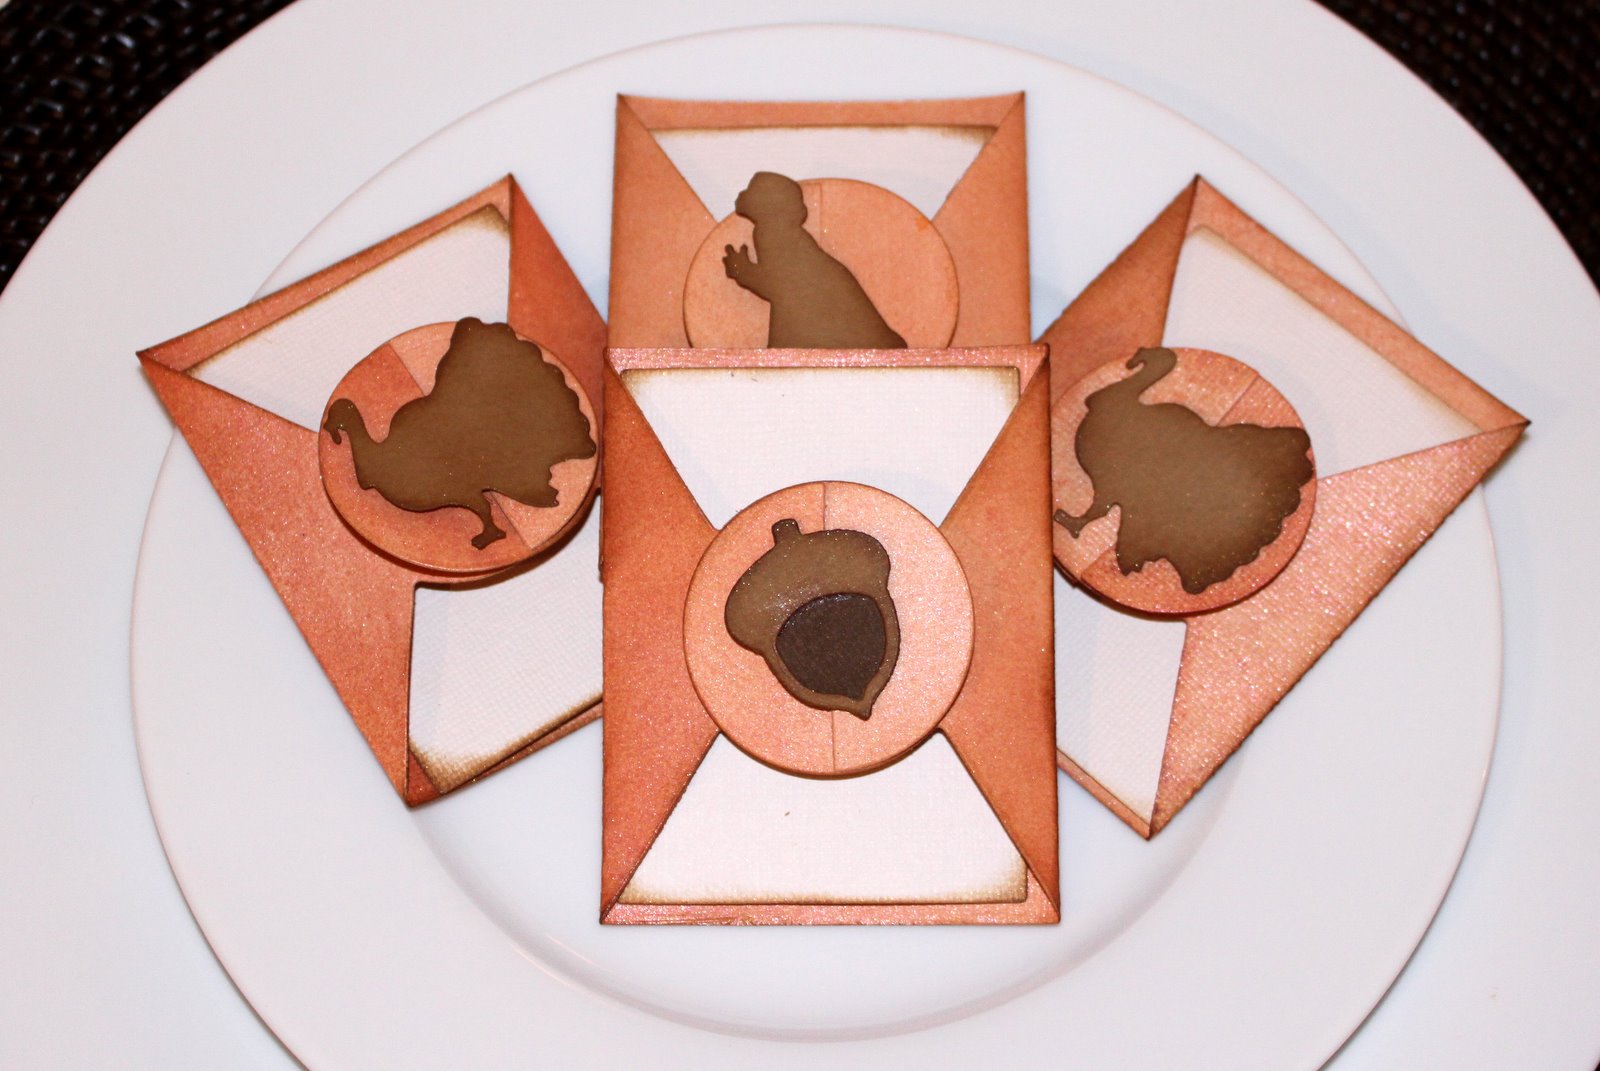
Supplies:
Lifestyle Crafts : PLACE SETTING KIT | Lifestyle Crafts : ACORN | Lifestyle Crafts : TURKEY SILHOUETTE | Bazzill Basics : 12" x 12" Monochromatic Cardstock: BROWN | Bazzill Basics : 12" x 12" Monochromatic Cardstock: VANILLA | Bazzill Basics : 12" x 12" Smoothies Cardstock: KRAFT | Tattered Angels: LIMITED EDITION GLIMMER MIST - 2 oz. spray bottle (Butternut Squash and Rum Punch)

Instructions:
  • Die cut vanilla paper with the Place Setting Kit (both the envelope and card).
  • Spray both sides of the envelope with Tattered Angels Glimmer Mist and let dry.
  • Die cut Thanksgiving images such as the Turkey and Acorn out of Brown and Kraft paper. 
  • Optional: Ink the edges of the card and Thanksgiving images with brown ink.
  •  Fold the envelopes, insert card, and adhere the Thanksgiving images to the front of the envelope.


Napkin Rings

Supplies:
Lifestyle Crafts : FEATHER HEADBAND | Bazzill Basics : 12" x 12" Monochromatic Cardstock: BROWN | Bazzill Basics : 12" x 12" Monochromatic Cardstock: VANILLA | Tattered Angels: LIMITED EDITION GLIMMER MIST - 2 oz. spray bottle (Butternut Squash and Rum Punch) | Tsukineko: Goosebumps Texture Spray - SHIMMER | Prima : SAY IT IN CRYSTALS - PASSION

Instructions:
  • Die cut the largest feather with vanilla cardstock, the smallest feather with brown cardstock, and the headpiece with brown cardstock.
  • Spray the largest feather with Tattered Angels Glimmer Mist and set aside to dry.  Ink the edges with a brown ink pad, if desired.
  • Spray the smallest feather and headpiece with Goosebumps spray to give it a shiny look.
  • Mat the brown headpiece strip to a piece of vanilla cardstock.
  • Wrap the headpiece strip around napkins and adhere the two ends together (leave it a little loose so guests can slide off the napkin holder).  Trim excess. Now you have a napkin ring!
  • Adhere the feathers to the napkin ring.
  • Attach a Prima Crystal to the feathers.


THANKS Jars

Supplies:
K & Company: TIM COFFEY HALLOWEEN & FALL 12X12 DESIGN PAPER PAD | Lifestyle Crafts : SPLENDID  | Bazzill Basics : 12" x 12" Monochromatic Cardstock: BROWN | Lifestyle Crafts : FOLIAGE | Kanban Crafts : DUO MIRROR REFLECTIVE - COPPER/BLACK | Making Memories : SCRAPBOOK EMBELLISHMENT STORAGE JARS - SMALL 6PK | Tim Holtz ADIRONDACK METALLIC MIXATIVES PEARL & COPPER | Tsukineko: Goosebumps Texture Spray - SHIMMER | Tulle

Instructions:
  • Die cut “THANKS” out of Copper paper.
  • Cut strips of paper from the Fall paper pack to wrap around the jars.  Mat the fall paper with brown cardstock on every-other one.
  • Spray strips of paper with Goosebumps to create a shimmer.  Let dry.
  • Die cut Foliage out of brown cardstock and adhere to the jars.
  • Adhere “THANKS” to the jars on top of the foliage.
  • Optional: The tops of these bottles were initially silver, but I wanted them copper to coordinate with the rest of the table.  To fix this, I used alcohol ink to die them copper.


Milk for Santa Glass Etching Mug
Designed for Oh My Crafts

Supplies: Oh My Crafts Vinyl and Transfer Tape | Armour Etch Glass Cream and paintbrush | Glass Mug or other glass material | Electronic Cutting Machine (Silhouette)

      Instructions:
1.     Cut the image you would like to use as a stencil out of vinyl with any electronic cutter. 
This image was designed on Silhouette Studio and cut with the Silhouette machine.  “Milk for Santa” is the Elephants in Cherry Trees font (free downloadable font). 
2.     Weed away images from vinyl liner so you are left with the template.
3.     Apply transfer tape to vinyl and use it to transfer the vinyl onto glass surface.  Press the vinyl down firmly and peel off transfer tape.
Tip: Make sure there are no bubbles around the opening of the images.  Bubbles in the solid part of the vinyl do not matter.
6.      Clean the exposed part of the glass then apply a thick layer of etching cream.  Let the cream sit for about ten minutes.
7.      Rinse cream completely off with water and then take off the vinyl.  Clean the glass and you’re done! 

Behind the glass is Kanban Crafts’ Mirror Paper and a bag of hot chocolate.  Adding a solid behind the glass etching really makes the glass stand out.

How to make a personalized tag:

Supplies: Martha Stewart : Christmas Custom Stamp Set | Lifestyle Crafts : Nesting Rings |Lifestyle Crafts : Nesting Lace Circles |Bazzill Cardstock: Red, White and Green |Tim Holtz : Distress Ink Pad for Embossing | American Crafts : Zing! Embossing Powder: White | Marvy Uchida - EMBOSSING HEAT TOOL
Instructions:
Create your own personalized stamp with the Martha Stewart’s Christmas Custom Stamp Set.  It is great for monogram setting, address labels, personalized messages, greetings, and more!

For this tag I added the Oh My Crafts stamping letters to the acrylic block and stamped it with an embossing ink pad onto red paper, sprinkled white embossing powder and then heat set the embossing powder.

Next I used the Lifestyle Crafts Nesting Circles to cut a circle around the stamp and then added another circle frame out of white.  Finished it off by die cutting the Nesting Lace Circle out of green cardstock and tying it with ribbon to our Christmas treats.

Christmas Towel and Soap Dispenser


Santa’s Suit Hand Towel

Designed for Oh My Crafts

Supplies: Silhouette : Fabric Ink (Black and White) | Oh My Crafts Vinyl and Transfer Tape | Hand Towel
Instructions:
Step 1: Create a stencil with vinyl and apply it to fabric.  Use transfer tape to help apply the vinyl if needed.
For the Santa’s suit, cut two 1”x 24” strips of black vinyl and apply them across the bottom of the towel about 2” apart.  Also cut three 1” circles out of black vinyl and apply the “negative” to the center of the towel as if they were Santa’s buttons. For the belt, cut a square inside a square and set this aside.

Step 2: Use a foam brush to dab ink onto fabric. Be aware that the paint might seep through the fabric, so add paper behind the project to stop the extra ink.

Step 3: Allow ink to dry completely, remove vinyl stencil, and iron to set the ink.

Step 4: When layering colors, repeat steps.


Soap Dispenser Inserts
Designed for Oh My Crafts

Supplies:
Clear Plastic Paper or Packaging | Holiday Stamp  (specifically: Stampendous : Cling : World Christmas, Saint Nick and Snowbody Frame) | Ranger Ink : Archival Ink Pads | Clear Soap Dispenser (such as Pureworks : Antibacterial Foam 7 oz. , or Pureworks : Antibacterial Foam 2.5 oz.)| Un-Du : Sticker, Tape and Label Remover 4oz.

Instructions:
1.     Peel off any labels on the soap dispenser.  Use Un-Du to remove any sticky residue.
2.     Stamp a clear sheet of plastic with a stamp and an Archival Ink Pad. Archival Ink Pad are unique from many ink pads because they are alcohol based, which makes them waterproof.  This is why they will not rub off plastic or other gloss papers.
3.     Let dry for 30 minutes.
4.     Remove soap dispenser lid, roll plastic and fit it through the top of the Soap Dispenser.  It will naturally unroll and form to the inside of the soap dispenser. Put soap lid back on.
5.     Tie ribbon around dispenser.

Cones

Cone Centerpieces
Designed for Oh My Crafts


Supplies Used:

Petersen-Arne : Craft Pedlers Paper Mache Set Cones Tall Kraft Set of 3 | Acrylic Paint - Bright White and Admiral Blue | Doodlebug : Sugar Coating Glitter | Silver Craft Wire | Red, White, Blue and Yellow Cardstock |  Use any of these Cricut Cartridges to cut stars: A Child’s Year, Accent Essentials, Ashlyn’s Alphabet, Celebrations, Doodlecharms, Doodletype, Sesame Street Font, Simply Street, Pagoda, Hannah Montana, Home Décor, Indie Art, or Makin the Grade.


Instructions:
1. Paint the cones with 2-3 coats of red, white, or blue paint.
2. Glitter the cones.
a. If using glitter, apply mod podge or spray adhesive and then sprinkle on glitter.
b. If using spray paint, take outside, spray and let dry.
3. Punch a hole at the bottom of the cone and stick one end of wire into the hole. Bend the wire to secure it inside the cone.
4. Wrap the wire around the cone so it spirals around the cone.
5. Cut stars out of red, white and blue paper with Cricut in various sizes ranging from ¾” to 5”. Embellish with Stickles, Mark Richards Metal Stickers and emboss with embossing folders.
6. Adhere stars to the wire using hot glue or Oh My Crafts: Exclusive Acid Free Craft Tape. These cones have the larger stars at the bottom of the cone and gradually gets smaller at the top.

Thursday, September 29, 2011


Technique: How to Use Sequins on Cards
Designed for Oh My Crafts


Supplies:

Instructions:
1.       Trim the double-sided adhesive sheet to the desired size
and peel off one liner from the double-sided adhesive sheet.
2.       Press sequins onto the sticky side of adhesive sheet.
3.       Trim the sequins that hang off the edge with a paper trimmer.
4.       Peel off the other liner of the double-sided adhesive sheet.
5.       Apply to card or envelope.
Voila!  Cute and easy (:


Saturday, September 24, 2011


Halloween Tray 
Featuring 'Be Spooked' Lifestyle Crafts Dies
Designed for Oh My Crafts


This year Lifestyle Crafts has released a collection of Halloween dies title "Be Spooked."  The collection includes bats, cats, spiders, pumpkins, witches, ghosts, a dimensional tree, and of course a spooky font.  Here I am showcasing these dies in a shadowbox tray.  My favorite part about this project was die cutting cork board for "October" and the broom stick.  I had never done that before! I also liked layering things to make them really stand out... after all, it is a shadow box!  

Main Supplies:
·         7 Gypsies: Shadowbox Tray: Brown
·         My Mind’s Eye: Mischievous: Paper

For those of you who are interested, I will post instructions and supplies for each box.

·         Supplies:
·         Instructions:
o   Cut Mischievous owl paper and insert in the background.
o   Die cut “October” with Splendid Alphabet out of adhesive-backed cork and stick to bottom right corner.
o   Die cut large bat out of adhesive-backed white chipboard, remove liner and sprinkle black glitter over adhesive.  Fold bat and adhere to the top right corner.
o   Apply crackle accents to the eyes, beak, wings and feet of the owl.


·         Supplies:
·         Instructions:
o   Cut Mischievous patterned paper and insert in the background.
o   Die cut Cat with black paper and adhere with foam square.
o   Die cut Web with sparkle black paper, trim to the size of rectangle and adhere to the box ledges.   Die cut spider with reflective black paper and adhere to web.
o   Die cut three Pumpkins, (one with a face and the other two without faces) out of Bazzill cardstock.  Assemble pumpkins.  Adhere two pumpkins in the back with glue and one in the front with foam square.

    Supplies:
·     Instructions:
o   Cut Mischievous paper and insert in the background.
o   Die cut small Bat with Adhesive chipboard, remove liner, sprinkle with black glitter, fold and adhere to upper left box.
o   Die cut the two medium sized Ghosts out of white cardstock, add banner from Mischievous paper kit and add Candi paper brads as eyes.  Adhere ghosts to background.
o   Die cut dimensional tree twice out of dark brown cardstock.  Adhere one tree directly to background and adhere the other to the side of the box so it stands out.
o   Die cut two spiders (from Web) and adhere to tree.
·       


            Supplies:
·         Instructions:
o   Cut Mischievous light blue paper to the size of boxes.
o   With SewEasy stitch piercer, pierce holes onto thin strip of light blue paper, leaving an inch at the bottom and thread black floss.
o   Die cut two black spiders with shiny black paper and one spider web with white paper and adhere.
o   Insert paper to box.

o   Cut Mischievous paper to the size of boxes and insert in box.
o   Die cut “beware” out of Splendid alphabet and Mischievous paper and apply Crackle Accents on top.  Set aside to let dry.  Once dry, adhere to Mischievous patterned paper, back with gold vinyl, and adhere to box.
o   Die cut Witch Kit with shiny black paper, gold vinyl, adhesive cork paper, orange glitter paper and Bazzill Cardstock.  Adhere the witch hat and broom in left box with foam squares.  Adhere the witch feet on the right box ledges. 
oDie cut Witch Silhouette with shiny black paper and adhere to a circle cut out of Mischievous patterned paper and adhere with foam square.