

Tuesday, November 8, 2011
Saturday, November 5, 2011

Tuesday, November 1, 2011

Saturday, October 29, 2011
Friday, October 28, 2011

Thursday, October 13, 2011
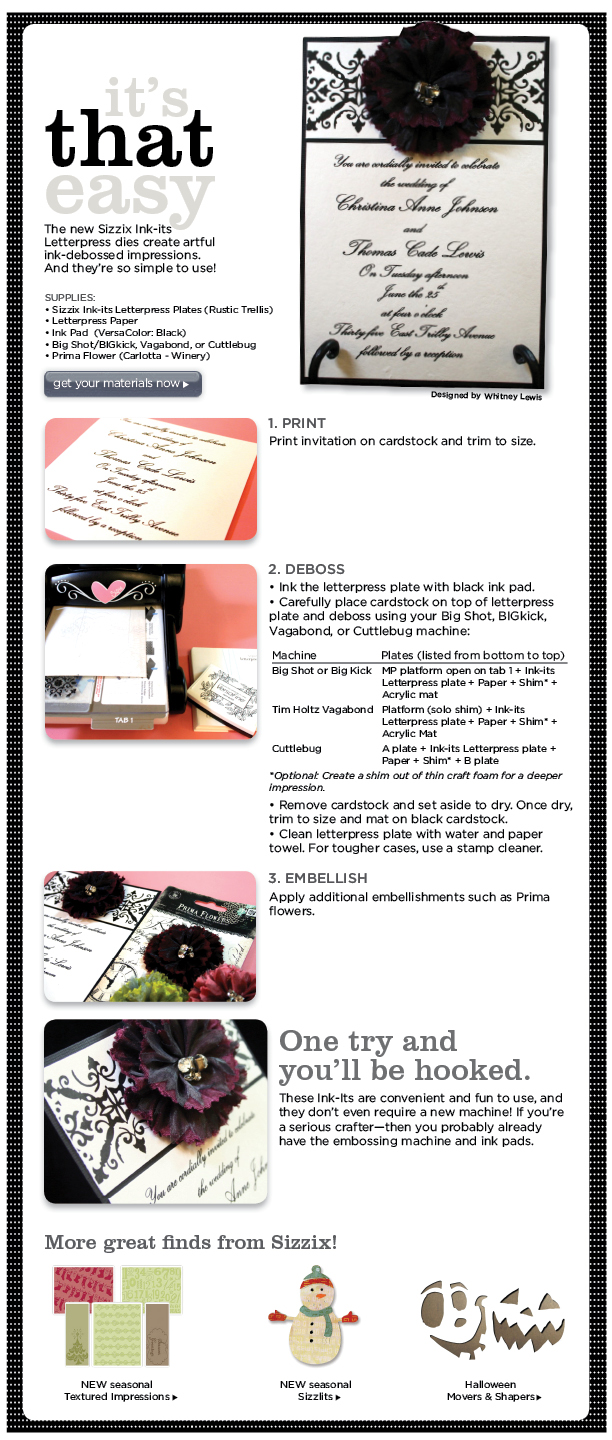
Mummy Party Favors
Designed for Oh My Crafts
Designed for Oh My Crafts

Supplies
- Kit-Kat Bars (or Hershey’s)
- White Paper
- EKSuccess : SPOOKY EYES STICKERS
- Tim Holtz Distress Ink Pad: Vintage Photo
- Scotch Tape

Instructions:
1. Cut 1” strips of white paper
2. Tape four 1”x12” strips together
3. Ink the edges with brown ink
4. Tape one end of paper to the back of Kit-Kat
5. Wrap the paper around the Kit-Kat
6. When finished, tape the other end to the back of Kit-Kat
7. Apply the stinkin' cute spooky eyes
Saturday, October 8, 2011
Spider Invitation and Party Favor Box
Spider Invitation and Party Favor Box
Made with the Pen Holder
Designed for Oh My Crafts

When you buy a cutting machine such as the Cricut Expression or Eclips, you have the option of getting a pen holder too. The pen holder replaces the standard blade holder to accommodate any felt tip or ball point pen to draw a shape. I found this addition to be such a fun way to add that little extra
something to your images. I especially enjoyed using a glue pen, sprinkling glitter on it and then cutting out the same image as a "shadow" feature.
Here are instructions and tips for how to use the Eclips Pen Holder:
Supplies:
Instructions:
Step 1: Cut out image with Eclips
Machine
·
With Eclips press the Pop-up Menu and set to Center
Point.
o
Tip: The Center Point feature lets you cut
an image and then takes the blade back
to the “center point” so it will draw the image in the same position.
·
Press
Cut.
o
This
spider was cut out of heavy cardstock at 2 ½”.
Step 2: Draw
·
Replace
the cutting blade housing with the pen holder.
·
Set
the Materials Option to Pen Holder and specify whether you’re using a marker,
ball pt, or glue pen.
o
Tip:
You can also do this through the Pop-up Menu.
o
Warning:
If you do not change this setting it may damage the tip of your pen because the
settings for cutting apply more pressure than for drawing.
·
Keep
the setting at Center Point.
·
Press
“Cut” (and it will draw).
·
These
spiders show two different ways to use the pen holder.
1) With a marker. This spider was drawn with an American Crafts
Metallic Silver Marker.
2) With a glue pen. This spider was drawn with Quickie Glue Pen
and then sprinkled with Elizabeth Craft Design Glitter.
Step 3: Apply
·
Peel
off your spider from the mat and apply to a card or gift box.
o
The
paper used in these projects is K
& Company: KELLY PANACCI HALLOWEEN 12X12 SPECIALTY PAPER PAD
Thursday, October 6, 2011
Halloween Plates
Spooky Plates
Designed for Oh My Crafts


If you want an easy decor project that will grab everyone's attention, this project is just for you! All I did was cut out images with black vinyl and my electronic cutter (Silhouette) and then stuck the vinyl to silver chargers. With the silver as the background, it looks like the images are glowing! It is so easy to do (and) when you're done with the Halloween season, you can peel off the vinyl and use the chargers for your Thanksgiving dinner, or redecorate them with other holiday decor.
I love it!
I love it!
Advice: Use transfer tape to help you apply the vinyl in one piece to the chargers. Also, if you happen to get bubbles in the vinyl, use a little pin to poke the holes and release the air.
Friday, September 30, 2011
Fright Night Invite
Fright Night Invite
Designed for Oh My Crafts

Remember in the Phantom of the Opera movie when the phantom seals his envelope with wax to trademark his message? Creepy, but awesome! With this in mind, Lindsey and I had fun in the design room a few weeks ago trying to figure out a way the crafting world can do it with the products they own. Our conclusion: wax+heat+stamp.
Invitation Supplies and Instructions:
Supplies Used:
Doodlebug Card and Envelope (Available in black) | Martha Stewart : HALLOWEEN BORDERS | Martha Stewart : ELEGANT WITCH DESIGNER PAPER PAD | Tsukineko : VERSAFINE: Smoky Grey Ink Pad | Oh My Vinyl : STORMY GREY (1 Sheet 12" x 24") and Transfer Tape | Tim Holtz : Stamp Set - MINI MUSE
Doodlebug Card and Envelope (Available in black) | Martha Stewart : HALLOWEEN BORDERS | Martha Stewart : ELEGANT WITCH DESIGNER PAPER PAD | Tsukineko : VERSAFINE: Smoky Grey Ink Pad | Oh My Vinyl : STORMY GREY (1 Sheet 12" x 24") and Transfer Tape | Tim Holtz : Stamp Set - MINI MUSE

Instructions:
1. Trim the skull border so there are 3 skulls and adhere to top of Doodlebug Card.
2. Cut two 3 ½” x 4 ½” rectangles using Martha Stewart patterned paper, ink the edges with stormy grey, and adhere to card (one on the front and one on the inside).
3. Cut “Fright Night” out with Silhouette Machine and Stormy Grey Vinyl and use transfer tape to apply to front of card.
4. On the inside of the card, cut a square of cream colored cardstock, ink the edges and adhere to card.
5. Stamp the skull in the lower right corner with stormy grey ink pad.
Phantom Seal

Supplies Used: Doodlebug Card and Envelope (Available in black) | Melt Art : BEESWAX-WHITE | Marvy Uchida - EMBOSSING HEAT TOOL | Tim Holtz : Stamp Set - MINI MUSE | Tattered Angels: MISTING MAT
Instructions:

Step 1. Lick envelope shut, pour about 2 tablespoons of wax into a container that will not melt when heat is applied, and with heat tool, melt wax entirely. Caution: Be careful when handling the container, it will be hot!

Step 2. While wax is still a liquid, pour over the seal of the envelope and
drop a stamp onto the wax. You do not need to press down on the stamp;
simply setting it in the wet wax will leave an image.


TIP: If you want to change the color of the wax, you must use a dye that is alcohol-based and not water-based such as Tim Holtz Alcohol Inks. Simply drip a few drops of the alcohol ink onto the wax before you have melted it and then follow the same directions as stated.
Thursday, September 29, 2011
Technique: How to Use Sequins on Cards
Designed for Oh My Crafts

Supplies:

Instructions:
1.
Trim the double-sided adhesive sheet to the
desired size
and peel off one liner from the double-sided
adhesive sheet.

2.
Press sequins onto the sticky side of adhesive
sheet.

3.
Trim the sequins that hang off the edge with a
paper trimmer.

4.
Peel off the other liner of the double-sided
adhesive sheet.

5.
Apply to card or envelope.


Voila! Cute and easy (:
Wednesday, September 28, 2011
Haunted Halloween Shadow Box
Halloween Shadow Box Made with Vinyl
Designed for Oh My Crafts

So I have to admit, this is one of my favorite vinyl projects but no matter how hard I try, my photography skills just don't do it justice, so please excuse the glare of the glass and instead marvel at how amazing vinyl can be when it is cut out of FREE fonts from the internet! I had such a fun time designing this project and layering the vinyl on the glass as well as the backdrop to make the phrases look like they are floating towards you. I think after Halloween is over, I might have to make one for every holiday (: If you happen to make one too, let me know. I would love to see your creative spin on the idea!
 Supplies Used:
 Silhouette SD | Shadow Box: 20”x20” from Ikea | Oh My Vinyl: Persimmon (3 sheets), Transfer Tape (3 sheets) | 2 Sheets of 12”x24” Black OMC Bazzill Cardstock | Optional Embellishments: American Crafts : Embossing Powder, Mini Halloween Stamp Set, Martha Stewart : Elegant Witch Stamp, EKSuccess : Spider Stickers
Instructions:
Step 1: Prepare Your Entire Design on Silhouette Studio (Sure Cuts A Lot or Make The Cut)
1. One of the great things about these software products is the ability to cut any font you have on your computer. For this project, I Google searched “Free Halloween Fonts” and installed the following fonts to my computer: Friday 13, FOO, Earwig Factory, Drips, Creeper, Bloodgutter, Badacid, Bones, Abaddon, and Trinigan. (Talk about gory names!)
2. Once you have installed a collection of spooky fonts, gather Halloween words and phrases. Here is a list of phrases I used: A haunting we will go | Trick or Treat | Creepy | Toil and trouble, Boil and bubble | Enter if you dare | Very Scary | Eeek! | Fright Night | Ghosts & Goblins | Keep Out! | Beware | Happy Halloween | All hallow’s eve | Spooky | Boo | Haunt | Wicked | Bones | Thrills & Chills | Hocus Pocus | Wicked | Caution | October 31st
3. Type the phrases in spooky fonts.
4. Enlarge the phrases you want to stand out and shrink other phrases.
5. Temporarily set the mat to 19” x19” so you know how big to make the phrases. Stretch, shorten, enlarge, and shrink the words to create a 19” square.
Step 2: Cut Vinyl.
1. When cutting a 19” square with the Silhouette, you will need to cut it in a few sections. I divided the 19” square into three 7”x19” strips.
2. Weed and apply transfer tape over the phrases (do not peel off the vinyl from its liner yet).
 Step 3: Shadow Box
1. Prepare the shadow box.
a. Adhere black 12”x24” paper to the back board.
b. Clean the glass with window cleaner.
2. With scissors, cut out the phrases you want on the glass and set aside (keeping in mind their position).
3. Peel off liner from vinyl and apply phrases to black paper with transfer tape.
a. TIP: Leave the transfer tape on until the end. By doing this it will help you line up the pieces on the glass like a puzzle.
4. Place the glass over the black paper and apply the rest of the phrases onto the glass using the background as a guide to help line up the words.
Step 4: Embellish
1. Embellish with Halloween spider web stamps and spiders onto the black paper to fill any empty spaces.
Step 5: Hang up on the wall and enjoy!
Skeleton Frame Display
Halloween
Décor Table Display
Designed for Oh My Crafts

Whether you’re decorating, crafting, or scrapbooking,
these Martha Stewart Crafts ™ and EK Success ™ Halloween products will excite
you all season. Create a spooky scene with these easy to assemble pre-glittered
and pre-cut candelabras, paper punches, mirror clings, skeleton keys and
classic Halloween designer paper.

Skeleton Key Frame Project

Supplies: EK
Success: Jolee’s Boutique- Skeleton Key Stickers or Martha Stewart: Skeleton Key
Embellishments | Martha
Stewart: Elegant Witch Designer Paper Pad | Bazzill
Paper: 12x12 Blackbird and Classic Purple | Bazzill
Basics: Perfectly Pleated: Blackbird or create your own with Bazzill cardstock
and Martha Stewart Scoring Board |
We R
Memory Keepers: Cinch Chipboard |
Making
Memories: Paper Reverie: Trim Card- Noir
Instructions:
1. Cut:
· Chipboard: 10 ½” x 10 ½”
· Dark Silver Glitter Cardstock: 8 ½” x 8 ½”
· Purple Cardstock: 6 ½” x 6 ½”
· Black Cardstock: 6 ¼” x 6 ¼”
· Silver Cardstock: 6” x 6”
2. Adhere:
a. Adhere the silver glitter, purple, black, and silver cardstock to the center of the chipboard.
b. Adhere the pleated paper around the edges.
Tip:
OMC sells Bazzill Basics’ premade pleated paper at an inexpensive price or you
can make your own by scoring cardstock in a ¾”, ¼”, ¾”, ¼” pattern and then folding
like an accordion.
c. Stick the skeleton keys on the silver cardstock in a funky pattern.
3. Tie ribbon:
a. Punch holes through the chipboard on the left and right side and tie ribbon/trim through.
c. Stick the skeleton keys on the silver cardstock in a funky pattern.
3. Tie ribbon:
a. Punch holes through the chipboard on the left and right side and tie ribbon/trim through.
Candelabras

Supplies:
Martha
Stewart: Creepy Glittered Candelabras
Instructions:
These stand-up candelabras from Martha
Stewart Crafts™ come pre-glittered and pre-cut for a no-mess way to add a
bewitching shimmer to your festivities. Simply unfold to stand. Makes two candelabras. Approximately 13"
high.
*** Also available Martha Stewart: Glittered Chandeliers ***
Bats

Supplies:
Martha
Stewart: Bat Window & Mirror Cling
Instructions:
Decorate for Halloween with these window
and mirror clings designed by Martha Stewart. The reusable adhesive allows for
these vinyl bats to be used year after year. This package includes twelve
self-clinging black bats in assorted sizes.
For this display, the backing was not removed and instead taped to the
wall and set on the table.
*** Also
available Martha Stewart: Spider Window & Mirror Cling
Spiderweb Table Trim

Supplies:
·
Martha
Stewart: Deep Double Edge Punch: Spiderweb
·
OMC
Bazzill Basics: 12” x24” Paper Multi-Packs: Black & White
Instructions:
With Martha Stewart Double Edge Punches
you can create your own party décor trim.
Simply punch the images out of 24” long paper. If you want longer trim, glue trims together.

*** Also
available: Martha Stewart: Skull & Crossbones and Scary Fence ***
Saturday, September 24, 2011
Halloween Tray
Featuring 'Be Spooked' Lifestyle
Crafts Dies
Designed for Oh My Crafts

Designed for Oh My Crafts

This year Lifestyle Crafts has released a collection of Halloween dies title "Be Spooked." The collection includes bats, cats, spiders, pumpkins, witches, ghosts, a dimensional tree, and of course a spooky font. Here I am showcasing these dies in a shadowbox tray. My favorite part about this project was die cutting cork board for "October" and the broom stick. I had never done that before! I also liked layering things to make them really stand out... after all, it is a shadow box!
Main Supplies:
·
7 Gypsies: Shadowbox Tray: Brown
·
My Mind’s
Eye: Mischievous:
Paper
·
Lifestyle
Crafts: Bats:
2 dies | Web
Border | Nesting
Ghosts | Witch
Kit | Cat
| Pumpkin
| Tag | Witch
Silhouette | Dimensional
Tree | Splendid
Alphabet
For those of you who are interested, I will post instructions and supplies for each box.

·
Supplies:
o
LC Bats, LC Splendid
Alphabet, QuicKutz
Adhesive-Backed Cork, QuicKutz:
4x12” Adhesive-Backed White Chipboard, Doodlebug:
Sugar Coating Glitter, Inkssentials: Crackle Accents
·
Instructions:
o
Cut Mischievous owl paper and insert in the
background.
o
Die cut “October” with Splendid Alphabet out of
adhesive-backed cork and stick to bottom right corner.
o
Die cut large bat out of adhesive-backed white
chipboard, remove liner and sprinkle black glitter over adhesive. Fold bat and adhere to the top right corner.
o
Apply crackle accents to the eyes, beak, wings
and feet of the owl.
·
Supplies:
 o
Web Border,
Pumpkin, Cat, 3L Foam Squares,
Bazzill
Cardstock (Orange, black, green), Kanban
Crafts: Duo Mirror Reflective- Copper/Black
o
Web Border,
Pumpkin, Cat, 3L Foam Squares,
Bazzill
Cardstock (Orange, black, green), Kanban
Crafts: Duo Mirror Reflective- Copper/Black
·
Instructions:
o
Cut Mischievous patterned paper and insert in
the background.
o
Die cut Cat with black paper and adhere with foam
square.
o
Die cut Web with sparkle black paper, trim to
the size of rectangle and adhere to the box ledges. Die cut spider with reflective black paper
and adhere to web.
o
Die cut three Pumpkins, (one with a face and the
other two without faces) out of Bazzill cardstock. Assemble pumpkins. Adhere two pumpkins in the back with glue and
one in the front with foam square.

o
Bats, Nesting Ghosts,
Web Border
(Spiders), Dimensional
Tree, Bazzill Cardstock (white and dark brown), QuicKutz:
4x12” Adhesive-Backed White Chipboard, Doodlebug:
Sugar Coating Glitter, Craftwork Cards:
Candi- BlackJacks and Foam
· Instructions:
o
Cut Mischievous paper and insert in the
background.
o
Die cut small Bat with Adhesive chipboard, remove
liner, sprinkle with black glitter, fold and adhere to upper left box.
o
Die cut the two medium sized Ghosts out of white
cardstock, add banner from Mischievous paper kit and add Candi paper brads as
eyes. Adhere ghosts to background.
o
Die cut dimensional tree twice out of dark brown
cardstock. Adhere one tree directly to background
and adhere the other to the side of the box so it stands out.
o
Die cut two spiders (from Web) and adhere to
tree.
·
 Supplies:
 Supplies:
o
Web Border,
Bazzill
Cardstock, We
R Memory Keepers: SewEasy Stitch Piercer Tool- Straight, SewEasy
Fancy Floss: Glitter-Neutrals, Kanban
Crafts: Duo Mirror Reflective- Copper/Black
·
Instructions:
o
Cut Mischievous light blue paper to the size of
boxes.
o
With SewEasy stitch piercer, pierce holes onto
thin strip of light blue paper, leaving an inch at the bottom and thread black
floss.
o
Die cut two black spiders with shiny black paper
and one spider web with white paper and adhere.
o
Insert paper to box.

Instructions:
o
Cut Mischievous paper to the size of boxes and
insert in box.
o
Die cut “beware” out of Splendid alphabet and
Mischievous paper and apply Crackle Accents on top. Set aside to let dry. Once dry, adhere to Mischievous patterned paper,
back with gold vinyl, and adhere to box.
o
Die cut Witch Kit with shiny black paper, gold
vinyl, adhesive cork paper, orange glitter paper and Bazzill Cardstock. Adhere the witch hat and broom in left box with
foam squares. Adhere the witch feet on
the right box ledges.
oDie cut Witch Silhouette with shiny black paper and adhere to a circle cut out of Mischievous patterned paper and adhere with foam square.
oDie cut Witch Silhouette with shiny black paper and adhere to a circle cut out of Mischievous patterned paper and adhere with foam square.

Subscribe to:
Posts (Atom)